Patchwork Sweater Knitting Pattern Guide: Choose a Method, Get the Fit Right, and Seam It Neatly
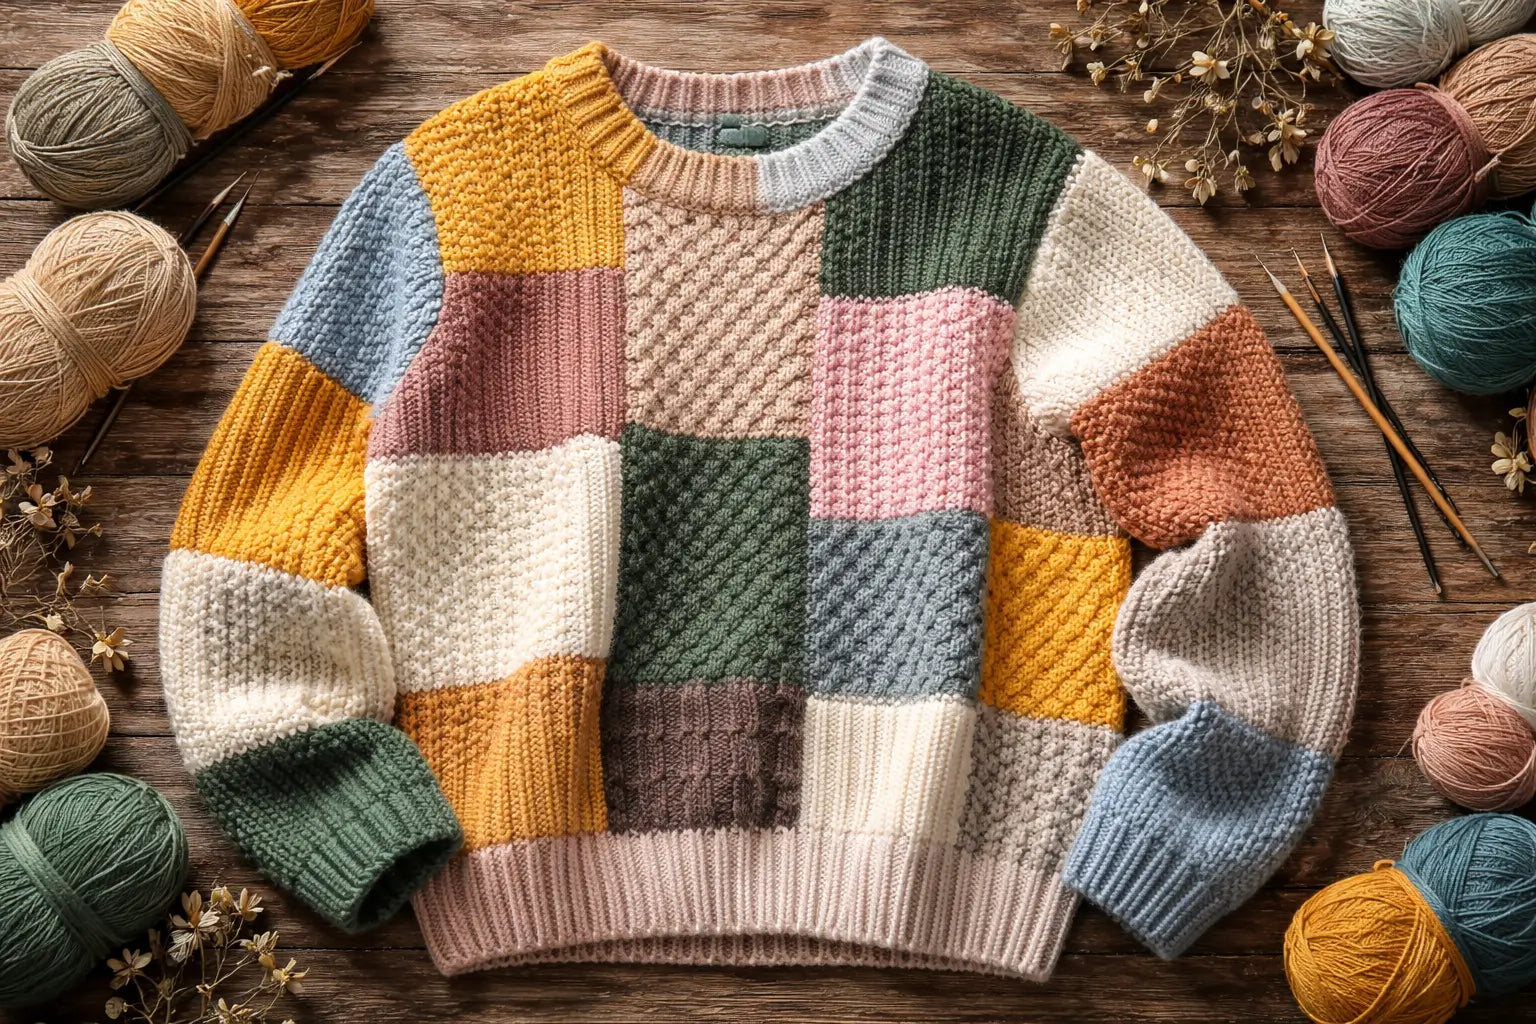
Table of contents
- Patchwork sweater patterns in 60 seconds
- What “patchwork” means in knitting (and why it changes the workload)
- How to choose a patchwork sweater pattern (free vs paid, skill level, sizing range)
- Yarn, fiber, and color planning for patchwork sweaters
- Sizing that actually fits: gauge, finished measurements, and ease
- Squares + seaming vs intarsia/grid: choose your construction method
- Seaming and assembly: flat joins, less bulk, cleaner edges
- Blocking, care, and durability for multi-color / mixed-fiber patchwork
- Beginner pathway: the simplest workflow that avoids rework
- Top patchwork sweater mistakes (and quick fixes)
- For brands: DIY patchwork idea → factory-ready sample request checklist
- Pattern rights: selling finished items and sharing pattern files
- FAQ
- Summary: your next steps
Patchwork sweater patterns in 60 seconds
| Your goal | Do this | Why it matters |
|---|---|---|
| Pick the right “patchwork” approach | Decide squares + seaming vs intarsia/grid first | Squares are modular but add seams; intarsia reduces seams but needs cleaner colorwork management |
| Get the fit right | Swatch → wash/block → measure before you choose a size | Gauge affects both size and fabric feel (drape/structure). (tkga.org) |
| Make it look neat | Treat finishing as part of the design: block consistently + seam strategically | Most “wonky patchwork” problems come from uneven pieces and bulky joins |
Quick decision rule:
- Choose squares + seaming if you like modular knitting, easy color swaps, and don’t mind finishing.
- Choose intarsia/grid if you want a smoother surface and fewer seams, and you’re okay managing color joins.
What “patchwork” means in knitting (and why it changes the workload)
In knitting, “patchwork” can mean a few different builds:
- Separate squares/rectangles sewn together (true patchwork construction)
- Panels knit in blocks (fewer pieces than squares)
- Intarsia/grid color blocks (patchwork look with fewer seams)
- Texture patchwork (same color, different stitches/textures per block)
Why this matters: your patchwork choice shifts where the effort goes—knitting complexity vs finishing complexity.
Boundary note: This article explains how to choose and execute patchwork construction. It doesn’t publish or reproduce pattern PDFs, charts, or row-by-row instructions.
How to choose a patchwork sweater pattern (free vs paid, skill level, sizing range)
A good patchwork pattern is the one you can follow cleanly, size reliably, and finish without surprises.
Pattern screening mini-table (what to check → why it matters)
| Check this in the pattern | Why it matters | Red flag |
|---|---|---|
| Finished measurements + schematic | Lets you pick size by actual garment dimensions | Only “S/M/L” with no measurements |
| Gauge info + swatching notes | Patchwork fit fails fast if gauge is off (tkga.org) | Gauge is missing or vague |
| Construction description (squares/panels vs intarsia/grid) | Determines piece count, seaming, and complexity | You can’t tell how it’s built |
| Technique list (pickup edges, bands, neckline finish, seaming) | “Beginner-friendly” depends on finishing load | Surprise techniques mid-pattern |
| Clear sizing/grading approach | Patchwork layout often changes with size | Only one size (unless that’s what you want) |
| Photo clarity + layout map | Helps you understand block placement | No layout guidance, lots of pieces |
Beginner-friendly usually means: simple stitches + predictable piece shapes + clear schematic + manageable finishing.
Cardigan vs pullover: which is easier to finish?
- Cardigan is often easier to try on as you go (fit checks feel safer), but you may need front bands/button bands and cleaner finishing edges.
- Pullover avoids bands/buttons but can demand more precision around neckline and overall fit.
Rule of thumb: pick the garment type that matches your patience for edge finishing (bands) vs overall fit precision.
Inspired-by patchwork looks (style cues without copying)
If you’re chasing a “famous patchwork vibe,” you can capture the feeling without cloning a proprietary layout:
- Reuse a small palette (2–5 core colors) and repeat them consistently
- Mix texture blocks (e.g., garter + rib + seed stitch) for a handcrafted look
- Keep block sizes consistent (or vary them deliberately in a repeating pattern)
Boundary note: avoid recreating an exact, distinctive layout stitch-for-stitch; use general design principles instead.
Yarn, fiber, and color planning for patchwork sweaters
Patchwork is forgiving visually—but yarn choices can make it bulky, inconsistent, or hard to care for.
Fiber + yarn weight: pick the feel first (drape vs structure)
- Want structure + crisp blocks? Choose a yarn weight that holds shape (often medium weights) and a fiber that doesn’t collapse easily.
- Want drape + softer patchwork transitions? A lighter weight or softer blend can reduce bulk at joins.
-
Mixing fibers/brands? Do it intentionally:
- keep yarn weight consistent
- swatch representative blocks from each yarn
- plan care for the most delicate fiber
For yarn weight terminology, it helps to use a standard system so your substitutions are apples-to-apples. (craftyarncouncil.com)
Color planning + dye lots: make it look intentional
A practical palette method:
- Pick one neutral (anchor) + 2–4 accent colors
- Repeat each color at least 3 times across the layout (so it looks planned)
- Use high contrast only where you want the eye to go (too much contrast everywhere can look noisy)
Dye lot guardrail: if you’re using the same “color name” across multiple skeins, try to keep the same dye lot for that color family—patchwork makes mismatches more visible.
Yardage estimation without guessing (method, not numbers)
You can estimate without inventing yardage:
- Knit one representative block/panel swatch and note:
- its finished size (after wash/block)
- how much yarn it consumed (by weighing before/after, or tracking length if known)
- Estimate how many blocks/panels you need for your size/layout
- Add extra for: sleeves, neckline/bands, and seaming tails (especially for many pieces)
- Cross-check against the pattern’s own guidance (if provided)
Boundary note: yarn needs depend on size, gauge, and construction method—avoid using someone else’s yardage number as your “truth.”
Sizing that actually fits: gauge, finished measurements, and ease
Gauge isn’t just about “matching the pattern.” It also affects fabric drape, stretch, and durability, so it changes how your patchwork looks and wears. (tkga.org)

The swatch workflow (knit → wash/block → measure → decide)
- Swatch using the yarn(s) and stitch pattern(s) you’ll actually use
- Wash/block the swatch the way you plan to wash the sweater
- Measure stitch/row gauge after it’s dry and stable
- Compare to the pattern gauge and decide:
- adjust needle size, or
- choose a different size, or
- accept a different fabric feel (only if you understand the trade-off)
Choosing size by finished measurements + ease (not by label)
- Use your body measurement (e.g., chest/bust) as the baseline
- Compare to the pattern’s finished garment measurements
- Decide your ease:
- Positive ease (garment larger than body) → cozy/oversized
- Lower ease → more fitted silhouette
Boundary note: size labels vary by designer; finished measurements are the reliable decision tool.
Keeping squares/panels consistent (before and after blocking)
Uneven patchwork usually comes from tension drift and measuring at different stages.
A repeatable routine:
- Measure each block/panel at the same stage (e.g., all after blocking)
- If a piece is off, fix it early: re-block, adjust tension, or remake before assembly
- Batch similar blocks together (same yarn + needles + stitch) to reduce drift
- Pin pieces during assembly so the grid stays straight
Squares + seaming vs intarsia/grid: choose your construction method
This is the single biggest decision that affects your workload and finish quality.

Comparison table (choose squares if… / choose intarsia if…)
| Choose squares + seaming if… | Choose intarsia/grid if… |
|---|---|
| You want modular progress (finish one block at a time) | You want a smoother surface with fewer seams |
| You plan to use many colors / stash yarn | You prefer managing color joins while knitting |
| You don’t mind seaming time | You want less finishing work afterward |
| You like swapping textures per block | You want a cleaner silhouette with less bulk at joins |
Boundary note: yarn weight changes this choice—heavier yarns make seams bulkier; lighter yarns are more forgiving.
Layout planning (grid map) before you knit
A simple grid-map process:
- Decide block size (finished measurement after blocking)
- Sketch a grid for front/back/sleeves (even rough is fine)
- Assign colors/textures and repeat them intentionally
- Build in symmetry (or planned asymmetry)
- Re-check the map for your size—patchwork layouts often need adjustment when grading up/down
Seaming and assembly: flat joins, less bulk, cleaner edges
Clean patchwork finishing is mostly about alignment + seam choice + assembly order.

Seam-method mini-table (best for / watch out for)
| Seam method (general) | Best for | Watch out for |
|---|---|---|
| Mattress-style seams | Flat, tidy joins with good alignment | Needs patience and consistent edges |
| Simple whip/overcast seams | Fast joining, sturdy | Can add bulk or show if pulled tight |
| Slip-stitch joins | Decorative ridge look | Adds texture; can stiffen joins |
Boundary note: the “best” seam depends on your stitch pattern and how much stretch you want in the join.
Assembly order (step list): seam without warping the grid
- Block pieces (or at least measure and stabilize them) before final assembly—blocking helps alignment. (cocoknits.com)
- Lay out your grid and pin corners/critical points first
- Join blocks into larger panels (front/back), then seam major seams (shoulders/sides)
- Attach sleeves after the body grid is stable
- Finish edges (neckline, cuffs, hem, bands) last, so you can correct fit/length cleanly
Bulk reduction tactics (especially shoulders/underarms)
- Prefer panel joins over many single-square joins where bulk accumulates
- Avoid stacking too many seam allowances at one point (stagger joins when possible)
- Keep join tension even—over-tight seams look bumpy and distort the grid
- If your yarn is thick, reduce seam bulk by choosing a join that lies flatter and doesn’t double up layers
Blocking, care, and durability for multi-color / mixed-fiber patchwork
Patchwork sweaters can last a long time—but mixed yarns need a conservative care plan.
Block before seaming? A simple decision rule
- If your yarn/fabric changes size noticeably after washing, block before final seaming so your pieces match the schematic and align cleanly. (cocoknits.com)
- If your fabric is very stable, you can sometimes seam first and block after—but patchwork is usually easier when pieces are stabilized.
Washing + color bleed: keep colors crisp
A safe default (especially with many colors):
- Test a small swatch wash first
- Use the gentlest method that suits the most delicate fiber
- Minimize agitation; dry flat
- If you’re unsure, treat it like a garment you don’t want to risk: gentle wash, cool conditions, low friction
Boundary note: dye behavior varies by yarn and color; testing is the safest guardrail.
Pilling, sagging, and ends that pop out
- Some pilling is normal—reduce it by minimizing friction at high-wear points and keeping fabric density appropriate (gauge matters). (tkga.org)
- Weave in ends with enough path length and avoid cutting tails too short—patchwork has many ends, so durability here is non-negotiable.
Beginner pathway: the simplest workflow that avoids rework
Yes—patchwork can be beginner-friendly, but only if you pick a method that matches your patience for finishing.
Beginner workflow (step list): swatch → first block → block-test → seam-test → fit check
- Choose a simple stitch (stockinette/garter/rib) and consistent block size
- Swatch and block to confirm your fabric and gauge
- Make one block, then block it and measure it
- Make a second block and do a test seam (you’ll learn a lot here)
- Start batching blocks, measuring every few pieces
- Assemble panels, do a fit check, then finish edges
Keeping pieces consistent (notes, batching, and layout tracking)
- Write down: needle size, yarn used, and finished block size
- Batch blocks by yarn/fiber where possible
- If you change needles or yarn mid-project, re-check gauge before continuing
Top patchwork sweater mistakes (and quick fixes)
Use this as a final “don’t step on rakes” checklist:
- Skipping the swatch → fix: swatch + block now, before you commit
- Measuring some pieces blocked and others unblocked → fix: measure everything at one stage
- Letting blocks drift in size → fix: batch work + measure routinely; remake outliers early
- Bulky seams at shoulders/underarms → fix: reduce join stacking; choose flatter seam method; join into panels first
- Grid looks crooked → fix: pin corners and alignment points before seaming
- Color palette feels messy → fix: limit palette; repeat colors intentionally
- Ends popping out → fix: weave longer paths; avoid trimming tails too short
For brands: DIY patchwork idea → factory-ready sample request checklist
If you’re developing a patchwork sweater for production (OEM/ODM), your biggest lever is spec clarity: the clearer your layout + measurements + yarn spec, the fewer sampling rounds you need.
What to provide (and why it matters)
| Provide this | Why it matters for sampling |
|---|---|
| Tech sketch + layout map (front/back/sleeves) | Controls color/texture placement and repeat logic |
| Measurement chart (finished garment) | Defines fit and targets for QC checks |
| Yarn spec (fiber content, yarn count/weight, colors) | Drives handfeel, durability, and color consistency |
| Construction choice (squares/panels vs intarsia/grid) | Impacts labor, finishing, and risk points |
| Stitch/texture notes per block | Prevents “looks different than the concept” issues |
| Trims + labeling + packaging needs | Aligns final product presentation and compliance requirements |
Patchwork-specific risk points to call out early:
- seam bulk where multiple joins meet
- panel/block dimensional consistency
- color placement accuracy (layout map must be unambiguous)
Boundary note: MOQ, lead time, and shipping timelines vary by design, yarn availability, and order quantity. Avoid assuming fixed numbers; request a quote with your tech pack.
Need a custom sample or quote for a patchwork knit?
Send your tech pack (or concept + layout map), target size range, yarn preference, and branding requirements (labels/packaging). A clearer spec usually means faster sampling and fewer revisions.
Pattern rights: selling finished items and sharing pattern files
People often mix up two different topics:
- Selling a finished item you made (a garment)
- Copying/sharing/distributing the pattern instructions (the written/design content)
Licenses vary by designer and platform, so always check the specific terms. The UK government’s guidance on knitting/sewing patterns notes that this is complex and fact-dependent, and it is not a substitute for legal advice. (gov.uk)
Safe vs not safe (general, informational)
| Usually safer | Usually not safe |
|---|---|
| Sharing photos of your finished sweater (with credit) | Uploading or reposting the pattern PDF/instructions |
| Linking to the pattern page where people can buy/download legally | Selling copies/scans of patterns or charts |
| Selling finished items when the license/platform permits | Assuming “personal use only” means nothing without checking terms |
Disclaimer: This section is general information, not legal advice. Rules and enforcement vary by jurisdiction and by the pattern’s license terms. (gov.uk)
FAQ
What is a patchwork sweater in knitting?
A patchwork sweater is a knit garment built from blocks—either separate squares/panels joined together, or a patchwork look made with color blocks (often via intarsia) and/or texture changes.
Are patchwork sweaters beginner-friendly?
They can be, if you choose simple stitches and a clear construction plan. The main challenge is consistency and finishing—measuring and seaming matter as much as knitting.
Squares vs intarsia: which patchwork method is easier and cleaner?
Squares are usually simpler to knit but require more seaming; intarsia has fewer seams but needs cleaner color management. Pick based on whether you prefer finishing work or colorwork focus.
How do I keep my patchwork squares the same size?
Use one measuring stage (all blocked or all unblocked), measure routinely, and remake outliers early. Batch similar yarns/blocks together to reduce tension drift.
Do I have to block patchwork squares before seaming?
If your fabric changes size after washing, block before final seaming so pieces align accurately. Blocking helps flatten and stabilize edges for easier seaming. (cocoknits.com)
What’s the neatest stitch to seam knitted squares?
A mattress-style seam is often chosen for flat, tidy joins, but the “best” seam depends on your stitch pattern and desired stretch. Test on two blocks before committing.
Can I sell a sweater I knitted from a pattern?
It depends on the pattern’s license terms and local rules. Selling a finished item and sharing/copying a pattern are different issues; check the license and platform terms, and treat guidance as informational—not legal advice. (gov.uk)
What does a manufacturer need to sample a patchwork sweater design?
A clear layout map, measurement chart, yarn spec, construction method, and stitch/texture notes per block—plus trims/label/packaging requirements. Clear specs reduce sampling back-and-forth.
Summary: your next steps
- Choose your construction method (squares vs intarsia) and map your layout.
- Swatch, block, and size by finished measurements + ease.
- Seam with alignment and bulk in mind—finish is part of the design.
- If you’re producing this as a brand, turn your idea into a tech pack + layout map before requesting samples.
If you’re developing a custom patchwork sweater for your label, prepare a simple spec pack (layout map + measurements + yarn/fiber + target sizes). It’s the fastest way to get a meaningful quote and sample plan.