Cable Knit Sweater Pattern Guide: How to Choose, Swatch for Gauge, and Nail the Fit (Plus a Brand Tech-Pack Checklist)
Cable-knit sweaters are gorgeous—but they’re also one of the easiest sweater projects to “almost finish” if you pick a pattern that doesn’t match your skills, your yarn, or your fit expectations. This guide helps you choose a cable knit sweater pattern you can actually complete, then get gauge and fit right before you invest weeks of work.
If you’re developing a cable-knit look for a brand and want to translate inspiration into production-ready specs, there’s a dedicated section near the end that focuses on factory-facing inputs (without hijacking the pattern intent).
Pick a cable knit sweater pattern in 60 seconds
A good cable sweater pattern is the one that matches your skill level, has clear sizing and gauge info, and uses cables in a way that won’t fight the construction.
Quick decision table
| If you are… | Pick a pattern with… | Avoid… |
|---|---|---|
| New to cables | One main cable motif repeated, strong row-by-row support, minimal shaping | All-over cables, complex yokes, vague abbreviations, no schematic |
| Can cable, first sweater | Straightforward shaping (raglan or drop-shoulder), clear stitch counts, stable panels | Multiple motifs changing every few rows, unclear gauge notes |
| Fit-sensitive | Try-on-friendly construction, finished measurements, explicit ease guidance | Patterns that only list “S/M/L” without garment measurements |
Non-negotiables to check before you download/buy
- Finished garment measurements (not just “sizes”)
- Ease notes (intended fit: fitted vs relaxed)
- Gauge instructions (stitch + row gauge, and whether to measure in pattern)
- Construction type (top-down/bottom-up; seamed/seamless; flat/in-the-round)
- Cable instructions clarity (chart, written, or both—with a clear legend)
Boundary notes
- If a listing doesn’t show finished measurements and gauge, assume you’ll spend extra time troubleshooting fit.
- “Beginner-friendly” depends on both cable comfort and sweater construction comfort.
If you want the simplest path to success, start by choosing where you’ll source patterns and what “free vs paid” really means for clarity and support.
Where to find cable knit sweater patterns (free vs paid)
You can find cable knit sweater patterns in marketplaces, designer shops, and curated roundups; the best source is the one that gives you the sizing, gauge, and construction detail you need upfront.
Key points
- Marketplaces are great for browsing and filters, but quality varies listing by listing.
- Designer shops often provide better updates/errata and consistent writing style.
- Roundups and community recs are great for discovery, but you still need to validate the specs yourself.
Best places to browse (in practical terms)
- Marketplaces/catalogs: Fast searching by yarn weight, difficulty, and construction.
- Designer pattern pages: Usually clearer pattern identity, photos, and updates.
- Roundups/community threads: Good “what people love,” but mixed rigor.
Free vs paid: what actually changes
Paid patterns often include more structured support (schematics, grading notes, update history), but price is not a guarantee of clarity. Free patterns can be excellent—just make sure the listing includes the same critical specs.
Checklist: before you download or buy
- Sizing: finished bust/chest measurement + length + sleeve measurements
- Ease: intended ease and how to choose size
- Gauge: stitch and row gauge, and where/how to measure
- Construction: top-down/bottom-up, seamed/seamless, flat/in-the-round
- Cable directions: clear legend and repeat logic (how often crossing rows occur)
- Shaping + cables: guidance where decreases/increases intersect cable panels
- Tools: cable needle required or optional; recommended markers/row tracking
- Yarn: weight + fiber suggestions + yardage estimate
- Support signals: errata/updates, clear photos from multiple angles
Boundary notes
- Availability, licensing, and file formats vary by platform—confirm you can access updates if needed.
- If cable panels intersect shaping without explanation, expect rework.
Once you’ve picked a few candidates, the next step is choosing a pattern that’s genuinely beginner-friendly for your current skills.
Beginner-friendly cable sweater patterns (and charts vs written instructions)
A beginner-friendly cable sweater pattern is one with predictable construction, clear instruction scaffolding, and cables that don’t clash with shaping.
Key points
- “Easy cables” are less important than “easy sweater architecture.”
- Clear schematics and stitch-count checkpoints reduce mistakes more than any single cable motif.
- The best pattern format is the one you can track consistently (chart, written, or both).
What makes a cable sweater pattern beginner-friendly
Look for:
- One main cable panel (or a few panels) rather than all-over cables
- Repeats you can memorize (cable crossings spaced predictably)
- Clear checkpoints (stitch counts after repeats, photos, or notes)
- Simple shaping (raglan, drop shoulder, or minimal yoke complexity)
- A real schematic with finished measurements you can compare to your own
Red flags:
- No finished garment measurements or schematic
- Cable chart legend missing or unclear
- Pattern assumes you’ll “just know” how to integrate cables with decreases/increases
- Vague gauge notes (especially if cables are the main texture)
Charts vs written instructions: which is easier?
It depends on how you track repeats and whether you like visual maps.
| Format | Usually easier when… | Watch out for… |
|---|---|---|
| Charts | You like visual repetition and marking rows | Legend unclear; shaping not shown clearly |
| Written | You prefer step-by-step checklists | Long rows hide repeat logic; harder to spot mistakes |
Boundary notes
- Cables can make fabric feel firmer and less stretchy than plain stockinette; ease and gauge matter more than you expect.
- A pattern can be “beginner-friendly” in cables but hard in construction (or vice versa)—validate both.
Before you commit to needles and yarn, get the gauge plan right—especially because cables can behave differently than a stockinette swatch.
Yarn + gauge: how to swatch cables correctly
Gauge is the foundation of sweater fit, and it’s measured from a swatch treated like the final garment (including washing/blocking when appropriate). A careful gauge check is one of the most reliable ways to avoid a sweater that ends up too small, too stiff, or oddly proportioned.
Evidence: Tin Can Knits’ gauge guidance emphasizes swatching and measuring after preparing the swatch. Gauge in Knitting (Tin Can Knits)
Key points
- Choose yarn for the cable look you want: crisp definition vs softer texture.
- Swatch in the actual cable pattern (not only stockinette) when cables dominate the fabric.
- Measure in the center of the swatch and adjust needle size before changing yarn.
Yarn choice for cables (stitch definition vs drape)
Cables “read” best when the yarn shows stitch definition, but that can trade off against drape and softness.
| Yarn trait | Typical cable look | Typical trade-off |
|---|---|---|
| Smooth/round plies | Crisp, high-definition cables | More structured feel |
| Lofty/soft | Cushy texture with depth | Edges may look softer |
| Halo/fuzzy | Romantic, blurred cables | Fine details are less distinct |
| Very drapey yarns | Flowing fabric | Cables can look flatter |
Step-by-step: swatch cables and measure gauge
- Swatch in the cable pattern used in the sweater, not only stockinette.
- Make the swatch large enough that the center area isn’t distorted by edges.
- Work the swatch the way you’ll work the sweater (flat or in the round, as applicable).
- Wash/block the swatch the way you’ll care for the finished garment.
- Measure gauge in the middle of the fabric (avoid edges), counting stitches/rows over the measurement span described in the pattern.
- If gauge is off, change needle size first, then re-swatch to confirm.
- Only after needle adjustments should you consider changing yarn, because yarn changes can also change handfeel and cable definition.
(If you’re new to cable mechanics, a step-by-step cable tutorial can help you understand what “hold stitches front vs back” means in practice.) Evidence: Cable Knitting Tutorial (Purl Soho)

Do cables use more yarn?
Often, textured stitches (including cables) can increase yarn usage compared with plain fabric, but it’s not a simple universal percentage. Treat yardage as “depends,” follow the pattern’s yardage guidance, and add extra margin when:
- you’re upsizing significantly,
- you’re adding more cable panels,
- you’re choosing a yarn that changes gauge or density.
Boundary notes
- Yardage varies with cable density, size, and construction—avoid one-size-fits-all multipliers.
- A gauge mismatch can change yardage needs too, so gauge comes first.
Once you’ve got yarn and gauge under control, construction choice becomes the next major lever for fit and finishing effort.
Construction & fit: top-down vs bottom-up cable sweaters
Top-down and bottom-up sweaters can both produce beautiful cables; the best choice depends on how you want to manage fitting, finishing, and cable alignment around shaping.
Key points
- Top-down often helps fit-sensitive knitters because you can try on as you go.
- Bottom-up can feel more stable for cable panel planning and structured finishing.
- Seams can add structure to heavier cable fabrics, but seamless can speed up knitting and fitting.
Top-down vs bottom-up comparison (required)
| Topic | Top-down | Bottom-up |
|---|---|---|
| Fit control | Try on as you go; adjust length early | Fit relies on schematic until later |
| Cable panel planning | Works well with planned panels; watch shaping points | Stable panel layout; watch joins/seams |
| Finishing | Often fewer seams (if seamless) | Often more structured finishing |
| Best for | Iterative fitting and adjustments | Knitters who prefer structured pieces and schematics |
Seamed vs seamless (quick take)
- Seamed: can feel more structured and stable (especially with dense cables); seams can help garments “hang” predictably.
- Seamless: faster finishing and easier try-on; cable alignment needs careful planning.

Boundary notes
- Many patterns are engineered for one construction style—don’t convert unless you’re comfortable re-mapping cable panels and shaping.
- Cable panels interacting with armholes, yokes, or decreases need explicit guidance (or careful planning).
If the terminology is confusing in listings, a quick definition of cable vs Aran vs “fisherman” makes it easier to interpret what you’re actually buying.
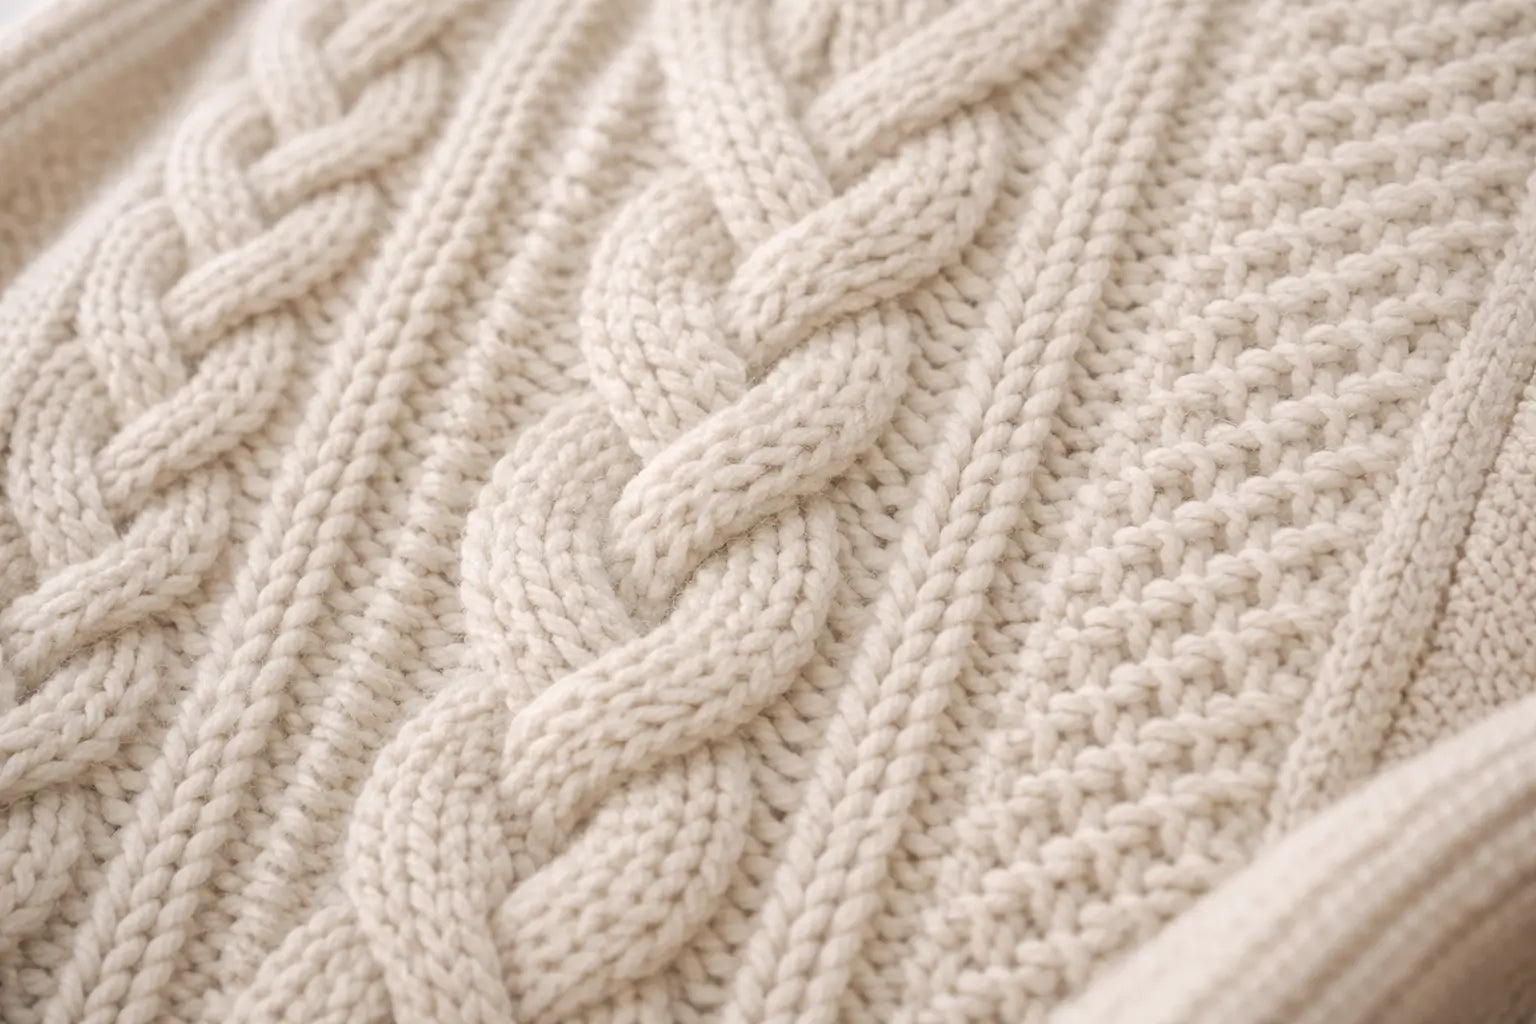
What “cable knit,” “Aran,” and “fisherman” really mean
A cable-knit sweater uses stitches that cross over each other to create raised, rope-like textures (the “cables”) on the fabric.
Key points
- “Cable knit” describes the technique (crossing stitches).
- “Aran jumper/sweater” is a named style associated with the Aran Islands, commonly featuring cables and other textured motifs.
- “Fisherman sweater” is often used as a retail nickname for Aran-style sweaters; naming is not always consistent across sellers.
Evidence (definition + context): Aran jumper (Wikipedia)
Motif mini-glossary (what you’ll see)
- Braid/rope cables: classic twisted columns
- Honeycomb textures: repeating cells that look like a grid
- Panel cables: one motif framed by ribbing/purl sections

Boundary notes
- Retail naming can be loose; focus on the stitch texture and motif you can see in photos.
- Historical “stitch meaning” stories are widely repeated but often debated; treat them as folklore unless you’re consulting a specialist source.
With terms clarified, the next step is avoiding the failure modes that make cable sweaters feel frustrating or look uneven.
Common cable sweater mistakes (and how to avoid them)
Most cable sweater problems come from gauge drift, uneven tension on crossing rows, or fit surprises caused by cable fabric pulling in.
Key points
- Swatching in the cable pattern reduces the most common sizing surprises.
- Stitch markers and row tracking reduce cable-direction mistakes.
- Fit issues often show up as “this feels tighter than expected,” even when the size label is correct.
Risk checklist (symptom → prevention)
- Sweater feels too tight or stiff → swatch cables, verify ease, adjust needle size and re-check gauge
- Cables look messy → slow down on crossing rows; use markers; confirm “hold front vs back” direction
- Uneven columns/tension → keep tension consistent; avoid over-tightening after a cross
- Cable panels drift → count stitches after repeats; check you didn’t add/drop stitches at crossings
- Unexpected narrowness → cables can pull fabric in; validate finished measurements and your gauge
Boundary notes
- Fix strategies depend on where the issue is (body vs sleeves vs yoke) and whether the sweater is seamed or seamless.
- Some “messiness” blocks out after washing/blocking; gauge errors usually don’t.
If you need to modify length or sleeves, small changes are safest when you preserve cable repeat symmetry.
Adjustments & customization (length/sleeves without breaking cable alignment)
Adjusting a cable sweater pattern is doable, but the safest changes keep cable motifs symmetrical and repeats intact.
Key points
- Adjust in whole cable repeats whenever possible.
- Avoid moving shaping points unless you understand how they intersect cable panels.
- If adding cables to a plain sweater, start with a simple central panel and keep the rest plain at first.
Boundary notes
- Any change that affects row count (length) should respect where crossing rows occur so motifs don’t “cut off” awkwardly.
If you’re taking a cable look from inspiration to a product line, you’ll need a different set of inputs than a hand-knitting pattern provides.
If you’re making this for a brand (OEM/ODM): turn the cable look into a tech pack
If you want a cable-knit sweater look in bulk production, you typically don’t hand over a consumer knitting pattern—you provide production-ready specs so a manufacturer can sample and reproduce the texture consistently.
Key points
- Clear visuals plus measurable garment specs beat long descriptions.
- Cable placement and consistency need explicit attention in sampling and QC.
- Timelines and feasibility depend on stitch complexity, yarn availability, and the number of revision rounds (no fixed promises).
Minimum viable tech-pack checklist (cable-knit edition)
- Reference visuals: front/back photos + close-ups of cable areas; include any stitch chart/stitch map if available
- Measurements: finished garment specs (chest, length, sleeve), size set, intended ease, and measurement tolerance concept
- Fabric intent: handfeel (soft vs structured), thickness, warmth/breathability target
- Yarn/fiber direction: preferred fiber blend, yarn feel/appearance goals, colorways
- Knit structure: where cables appear (front panel vs all-over), rib specs, neckline/cuff/hem finish
- Trims & branding: labels, hangtags, buttons (if cardigan), packaging requirements
- Quality focus points: cable consistency, measurement control, and any test expectations (e.g., shrinkage/pilling targets if you use them internally)
Boundary notes
- Sampling usually takes longer when cable artwork is complex, yarn sourcing is uncertain, or fit/handfeel needs multiple iterations.
- If you only have inspiration photos, start with a clear “must-match” list (cable placement, handfeel, measurements) and accept that sampling is an iterative process.
Ready to translate a cable-knit concept into production-ready specs?
Send:
- a reference image (front/back + close-ups),
- your target size range + key measurements,
- your target quantity window and yarn/fiber preference (if known).
We’ll confirm what’s needed for sampling and what factors can affect feasibility and timelines (which vary by design and materials).
A quick FAQ can clear up the most common “last-mile” questions before you start knitting (or before you brief a team).
FAQ
-
Q: Are cable sweaters hard to knit?
A: They can be slower and less forgiving than plain sweaters, but “hard” depends on construction and instruction clarity. Start with one main cable panel and predictable shaping, and choose a pattern with clear measurements and gauge notes. -
Q: Do cables use more yarn than plain knitting?
A: Often yes, because textured stitches can change density and how width behaves, but the amount varies by cable density, size, and gauge. Follow the pattern’s yardage guidance and add margin if you’re upsizing or adding more cables. -
Q: How do you swatch for cable gauge correctly?
A: Swatch in the cable pattern, make it large enough, wash/block it like the finished garment, then measure in the center over the pattern’s measurement span. If gauge is off, change needle size first and re-swatch. Gauge in Knitting (Tin Can Knits) -
Q: Charts vs written cable instructions—which is easier?
A: Charts are easier if you like visual repeats and marking rows; written instructions are easier if you prefer step-by-step checklists. Many knitters prefer having both so they can cross-check. -
Q: Top-down vs bottom-up sweater—which is easier to fit?
A: Top-down is often easier to fit because you can try on as you go, but bottom-up can feel more stable if you rely heavily on schematics and prefer structured finishing. The “easier” option is the one that matches how you like to fit and finish garments. -
Q: What is an Aran sweater (and is it the same as fisherman)?
A: An Aran jumper is a named style associated with the Aran Islands and commonly features cables and other textured motifs; “fisherman sweater” is often used as a nickname in retail, but naming isn’t perfectly consistent. Aran jumper (Wikipedia) -
Q: How do I turn a cable knit look into a manufacturing tech pack?
A: Start with clear visuals and measurable specs: cable placement, finished measurements and size set, fabric intent, yarn/fiber direction, trims/packaging, and quality focus points (especially cable consistency). Sampling is typically iterative and depends on stitch complexity and yarn sourcing.
Conclusion
Pick a cable knit sweater pattern that matches your skill level and your tolerance for complexity, then protect your outcome by swatching and measuring gauge the right way. Construction choice (top-down vs bottom-up, seamed vs seamless) determines how you fit and finish—and how cleanly cable panels stay aligned.
If you’re turning this aesthetic into a product line, the tech-pack checklist is the fastest way to move from inspiration to a reproducible sample without guesswork.
)