Cropped Sweater Crochet Pattern Guide: How to Choose, Size, and Customize Your Fit
Choose a pattern + size it (in 2 minutes)
You can pick a cropped sweater crochet pattern confidently by choosing the construction style first, then confirming the sizing method, and finally validating fit with a swatch and your measurements. The goal is to avoid the two biggest regrets: choosing a build you hate (seaming vs shaping) and ending up with the wrong size.
Key points (quick chooser):
- Construction: drop-shoulder, raglan, or panels (each “feels” different to make and wear).
- Sizing method: size chart vs made-to-measure (you need different inputs).
- Fit intent: fitted vs relaxed is controlled by ease and your gauge.
- Pattern clarity: garments need measurements, assembly notes, and clear repeats.
- “Cropped” is adjustable, but edit length in the right place to protect armholes.
2-minute steps:
- Decide what you want to enjoy more: simple shaping (raglan) or simple math (panels/drop-shoulder).
- Choose your fit: fitted, standard, or oversized—this is where ease matters.
- Measure your bust/chest and a preferred body length (crop). Use standard measuring points to stay consistent.
- Swatch the stitch pattern, wash/block it the way you’ll treat the sweater, then measure gauge.
- Only then commit to a size (or do made-to-measure math) and start your sweater.
Boundary conditions (why this works):
- Two people using the same pattern can get different results if their gauge differs after washing/blocking.
- “Best” patterns depend on your style goals and your tolerance for seaming, shaping, and try-ons.
Once you have that quick framework, it helps to define the few terms that make garment patterns feel confusing at first.
The 5-point pattern picker (skill level + fit + construction + sizing + clarity)
The “right” cropped sweater pattern is the one that matches your current skills and your desired fit, not the one with the most hype.
Use this checklist:
- Skill level reality-check: Are you comfortable counting rows, tracking repeats, and sewing seams neatly?
- Fit goal: Do you want a fitted crop or a roomy layer piece?
- Construction preference: Drop-shoulder, raglan, or panels (you’ll choose in the next sections).
- Sizing style: Does it use a size chart, made-to-measure, or both?
- Clarity test: Does the pattern show measurements, assembly steps, and what to check during the build?
Boundary conditions:
- A “beginner” label can still assume you know how to measure and swatch.
- Free patterns range from excellent to confusing—evaluate completeness before you start.
Before you start downloading patterns, the sizing workflow below will save you from the most common fit issues.
The 3-step sizing recipe (measure → choose ease → swatch + block)
Sizing a crochet sweater is simple when you separate body measurements from finished garment measurements and let gauge do its job. A swatch that’s washed/blocked like the final sweater is the fastest way to avoid a surprise fit.
Key points:
- Measure consistently (same points every time).
- Choose ease intentionally (loose vs fitted).
- Check gauge after blocking if the pattern expects a finished fabric behavior.
Steps:
- Measure bust/chest (and upper arm if sleeves are fitted).
- Pick your fit: fitted, standard, or oversized—this determines how much ease you want.
- Swatch the stitch pattern, wash/block it, then measure stitches/rows per the pattern’s gauge method.
Boundary conditions:
- Fiber and stitch pattern affect how much fabric relaxes after washing/blocking.
- Changing yarn or hook size usually changes gauge, even if the label “weight” looks similar.
With that in mind, a quick glossary makes the rest of this guide much easier to skim.
Quick glossary: gauge, ease, “to fit” vs “finished”, made-to-measure
These terms show up across garment patterns, and understanding them makes pattern selection and sizing far less stressful.
| Term | What it means | Why it matters |
|---|---|---|
| Gauge | How many stitches/rows make a set measurement in your fabric | Gauge controls finished size more than your hook size “number” does |
| Ease | The difference between your body measurement and the garment’s finished measurement | Ease is how you get fitted vs relaxed vs oversized sweaters |
| “To fit” | A body measurement range the size is designed for | Helpful for choosing a size, but only works if gauge matches |
| “Finished measurement” | The garment’s actual measurement when completed | This is what you compare to your body measurement to understand ease |
| Made-to-measure | A method where you use your measurements (and gauge) to calculate your sweater | Great for custom fit, but requires careful measuring and try-ons |
Boundary conditions:
- Different designers present sizing differently; always read how the pattern defines “to fit” and “finished.”
- If a pattern doesn’t tell you what measurements it’s using, expect more trial-and-error.
Now let’s turn the “too many options” problem into a clear decision process.
How to choose the right cropped sweater crochet pattern (Q1)
The best way to choose a cropped sweater pattern is to decide the construction first, then confirm the sizing style, and finally check whether the pattern includes the garment details you’ll actually need.
Key points (what to decide first):
- Construction style (drop-shoulder vs raglan vs panels)
- Fit intent (fitted, standard, oversized)
- Sizing style (size chart vs made-to-measure)
- Pattern completeness (measurements, assembly, check-in points)
A quick “if you want X, choose Y” map:
- Want minimal shaping? Try panels or drop-shoulder.
- Want shaping built in as you go? Try a raglan.
- Want maximum flexibility in crop length? Look for patterns that encourage try-ons or provide multiple lengths.
- Hate sewing? Choose a pattern with fewer seams or cleaner join methods (and clear finishing notes).
Boundary conditions:
- A pattern can be trendy and still be incomplete; for garments, completeness matters.
- “Free” doesn’t mean “bad,” but it does mean you should verify what’s included before committing.
To make this more concrete, here’s how the three common constructions differ.
Pick your construction first: drop-shoulder, raglan, or panels
Choosing construction early prevents the “I didn’t realize this needed a lot of seaming/shaping” moment halfway through.

Key points:
- Drop-shoulder: rectangular body + sleeves attached with a more boxy shoulder.
- Raglan: diagonal lines from neckline to underarm; shaping happens as you build the yoke.
- Panels: front/back pieces (and sometimes sleeve pieces) built separately, then seamed.
What each is best for:
- Drop-shoulder: relaxed, roomy crops; simple shaping; beginner-friendly if you don’t mind seams.
- Raglan: smoother shoulder fit; you can try it on as you go; great if you like “one piece” builds.
- Panels: easy to measure and adjust; clean geometry; can be very predictable if you count rows well.
Boundary conditions:
- “Easiest” depends on whether you prefer seaming (panels/drop-shoulder) or shaping as you go (raglan).
- Cropped length changes can affect proportions differently in each construction.
Once you know the build style, the next choice is whether you’re following a size chart or making it to your measurements.
Check sizing style: size chart vs made-to-measure (and what you need for each)
A size chart works best when you can match gauge closely; made-to-measure works best when you’re willing to measure and check fit more often.
Key points:
- Size chart patterns: you choose a size, then follow stitch/row instructions for that size.
- Made-to-measure patterns: you use your measurements and gauge to calculate counts, often with try-ons.
What you need before you begin:
- For size chart: your bust/chest measurement + the pattern’s gauge + the pattern’s “to fit” and/or “finished” chart.
- For made-to-measure: bust/chest + body length (crop) + sleeve length + consistent measuring method.
Boundary conditions:
- “To fit” ranges don’t guarantee fit if your gauge changes after washing/blocking.
- If you’re between sizes, your intended ease matters more than the letter on the label.
Whether the pattern is free, paid, or on a marketplace, the completeness checklist below helps you avoid unclear garment instructions.
Pattern completeness checklist (use this on any free blog, Etsy, or Ribblr listing)
A good garment pattern gives you enough information to predict fit and assembly before you start—especially for sweaters.
| Checklist item | Why it matters | What to look for |
|---|---|---|
| “To fit” and/or finished measurements | Prevents size confusion | A clear chart or list showing what each size is meant to fit or measure |
| Gauge instructions | Controls finished size | Stitch pattern used for gauge + how to measure it (ideally after washing/blocking) |
| Construction overview | Helps you choose what you enjoy | “Drop-shoulder,” “raglan,” or “panels,” plus a simple assembly summary |
| Schematics or clear photos | Reduces assembly mistakes | A basic diagram or multiple step photos for seams and neckline |
| Check-in points | Stops problems early | Notes like “try on here” or “measure here before continuing” |
| Yarn/hook guidance + substitutions note | Predicts fabric behavior | A yarn weight/fiber suggestion and a reminder to swatch if substituting |
Boundary conditions:
- If several items are missing, expect extra trial-and-error (and be mentally ready for it).
- If you’re buying a PDF, you’re usually paying for clarity and structure, not a guarantee of perfect fit.
If you’re new to garments, the next section helps you pick a construction style that’s forgiving and motivating for a first sweater.
Beginner picks: drop-shoulder vs raglan vs panels (Q2)
Yes—beginners can crochet a cropped sweater, especially with a forgiving construction and a pattern that tells you what to measure and when to check fit.
Key points for beginner success:
- Choose a construction that matches what you enjoy (seaming vs shaping).
- Prefer simple stitches and clear repeats over fancy texture for your first garment.
- Pick patterns with check-in points so you can catch problems early.
| Construction | Why beginners like it | Watch-outs | Best if you… |
|---|---|---|---|
| Drop-shoulder | Simple shapes; easy to measure | Seams matter for a neat finish | Don’t mind joining and want a relaxed fit |
| Raglan | Try-on friendly; smoother shoulder fit | Requires tracking increases carefully | Prefer shaping as you go and fewer seams |
| Panels | Predictable geometry; easy to adjust length | Multiple pieces to align and seam | Like measuring/row counting and want control |
Beginner checklist (before you start):
- You can explain your construction in one sentence (so you know what you’re building).
- You have a measuring tape and can measure bust/chest and length consistently.
- You’re willing to swatch and measure gauge (especially if you substitute yarn).
Boundary conditions:
- A cropped sweater can still feel “advanced” if the neckline or sleeves require precision.
- If you hate counting, choose a pattern with clear check-in measurements rather than long repeated instructions.
Now that you’ve picked a build style, sizing is where sweaters succeed or fail—so let’s make it predictable.
Sizing that actually works: measurements, ease, gauge, blocking (Q3)
A crochet sweater fits when your measurements, intended ease, and finished gauge all agree; if one changes, the final size changes too. The simplest workflow is: measure consistently → choose ease (fit style) → swatch and block before committing.

Key points:
- Standard measuring points keep your sizing decisions consistent.
- Ease explains how you want the sweater to sit on your body.
- Gauge measured after washing/blocking is often closer to your true finished sweater fabric.
Sizing steps (repeatable):
- Measure bust/chest and record your target cropped length.
- Decide fit style (fitted, standard, oversized) and understand how ease changes the finished measurement you want.
- Swatch in the pattern stitch, wash/block it like the final sweater, then measure gauge.
- Choose a size (or calculate made-to-measure counts) based on finished measurement + desired ease.
Boundary conditions:
- Different fibers/stitches respond differently to washing and blocking.
- Yarn or hook changes can shift gauge enough to change fit, even if the sweater “looks” the same.
To apply this workflow smoothly, start with the measurement points that actually matter for a cropped sweater.
Measure points you actually need for a cropped sweater
For most cropped sweaters, you’ll get 90% of the fit right with a small set of measurements used consistently. The Craft Yarn Council’s standard body sizing guidance is a reliable reference for common measurement points.
Key points:
- Measure bust/chest at the fullest point (snug but not tight).
- Decide your cropped length based on how you plan to wear it (with high-rise jeans, over a dress, layered over a tank).
- If sleeves are fitted, measure upper arm and arm length.
- Note your preferred neckline (high crew, wide, off-shoulder) so you don’t end up surprised.
Quick measurement list:
- Bust/chest
- Body length (from shoulder or underarm, depending on pattern instructions)
- Sleeve length (if applicable)
- Upper arm (if sleeves are snug)
Boundary conditions:
- Measure while wearing the kind of layer you’ll wear under the sweater (it changes comfort).
- Use the same measuring method every time; switching methods mid-project creates confusion.
Once you know your measurements, ease is the piece that turns numbers into the fit you actually want.
Ease explained (fitted vs relaxed) and how to use “finished measurements”
Ease is the difference between your body measurement and the garment’s finished measurement, and it’s the clearest way to describe fitted versus relaxed sweaters.
Key points:
- Positive ease: sweater is larger than your body (roomy/relaxed).
- Zero ease: sweater matches body measurement closely (more “true to body”).
- Negative ease: sweater is smaller than your body and stretches to fit (more fitted).
| Fit goal | What you’ll see in the pattern | How to choose a size |
|---|---|---|
| Fitted | Smaller finished measurement vs body | Choose based on “finished measurement” and stretch behavior |
| Standard | Slightly larger finished measurement | Choose the size whose finished measurement matches your desired ease |
| Oversized | Noticeably larger finished measurement | Choose a larger finished measurement intentionally (not by accident) |
Boundary conditions:
- The best ease is personal and style-dependent; a crop worn over a dress might want more ease than a crop worn alone.
- If a pattern gives both “to fit” and “finished,” use “finished” to understand ease and “to fit” to shortlist sizes.
Now we’ll connect those fit choices to the practical step that makes sizing real: swatching and blocking.
Swatching + blocking: how to check gauge before you commit
A gauge swatch is only useful if it behaves like your final fabric; washing and blocking can change the measured size of stitches and rows, which is why many educators recommend treating your swatch like your finished garment.
Key points:
- Swatch in the actual stitch pattern used for the sweater (not a random stitch).
- Wash/block the swatch the way you will wash/block the finished sweater.
- Measure stitches/rows after the swatch is fully dry and settled.
Steps:
- Make a swatch larger than the area you’ll measure (edges can distort).
- Wash or wet-block/steam-block according to fiber needs and your intended care routine.
- Let it dry completely, then measure gauge in the center of the swatch.
- If gauge is off, adjust hook size or yarn choice and repeat.
Boundary conditions:
- Some fibers can “grow” more than others; measuring after treatment helps you predict the final fabric.
- If you change yarn or hook mid-project, you may need to re-swatch to keep fit consistent.
Once fit foundations are solid, yarn and hook choices become a creative decision instead of a sizing gamble.
Yarn + hook choices: drape vs structure, substitutions (Q4)
Choose yarn and hook size based on the fabric you want—soft and drapey versus structured and cozy—then protect fit by re-checking gauge whenever you substitute materials.
Key points:
- Yarn weight and fiber affect drape, warmth, and how crisp stitch texture looks.
- Hook size changes fabric density, which can change both look and finished size.
- Substituting yarn often changes gauge; swatching is the safety net.
| Your goal | Yarn traits to look for | Notes |
|---|---|---|
| Lightweight crop for layering | Smooth yarn, comfortable against skin, good drape | Lighter fabrics show fit details more clearly |
| Cozy cropped sweater | More loft, warmth, and a fabric that holds shape | Heavier yarns can feel bulky in a short length |
| Crisp texture / stitch definition | Smooth plies, less halo | Great for ribbing and clean edges |
| Soft and slouchy | Softer fibers, more drape | May stretch more; swatch and measure after blocking |
Substitution checklist:
- Match the intended fabric feel first (drape vs structure), not just the label “weight.”
- Check yardage/length so you don’t run short.
- Swatch, wash/block, and measure gauge before committing.
Boundary conditions:
- “Same weight” yarns can behave differently across brands and fibers.
- If you substitute to a very different fiber, your blocking/care method may need to change too.
With yarn sorted, you can choose the style details—neckline, sleeves, and stitch density—that make the sweater feel like “you.”
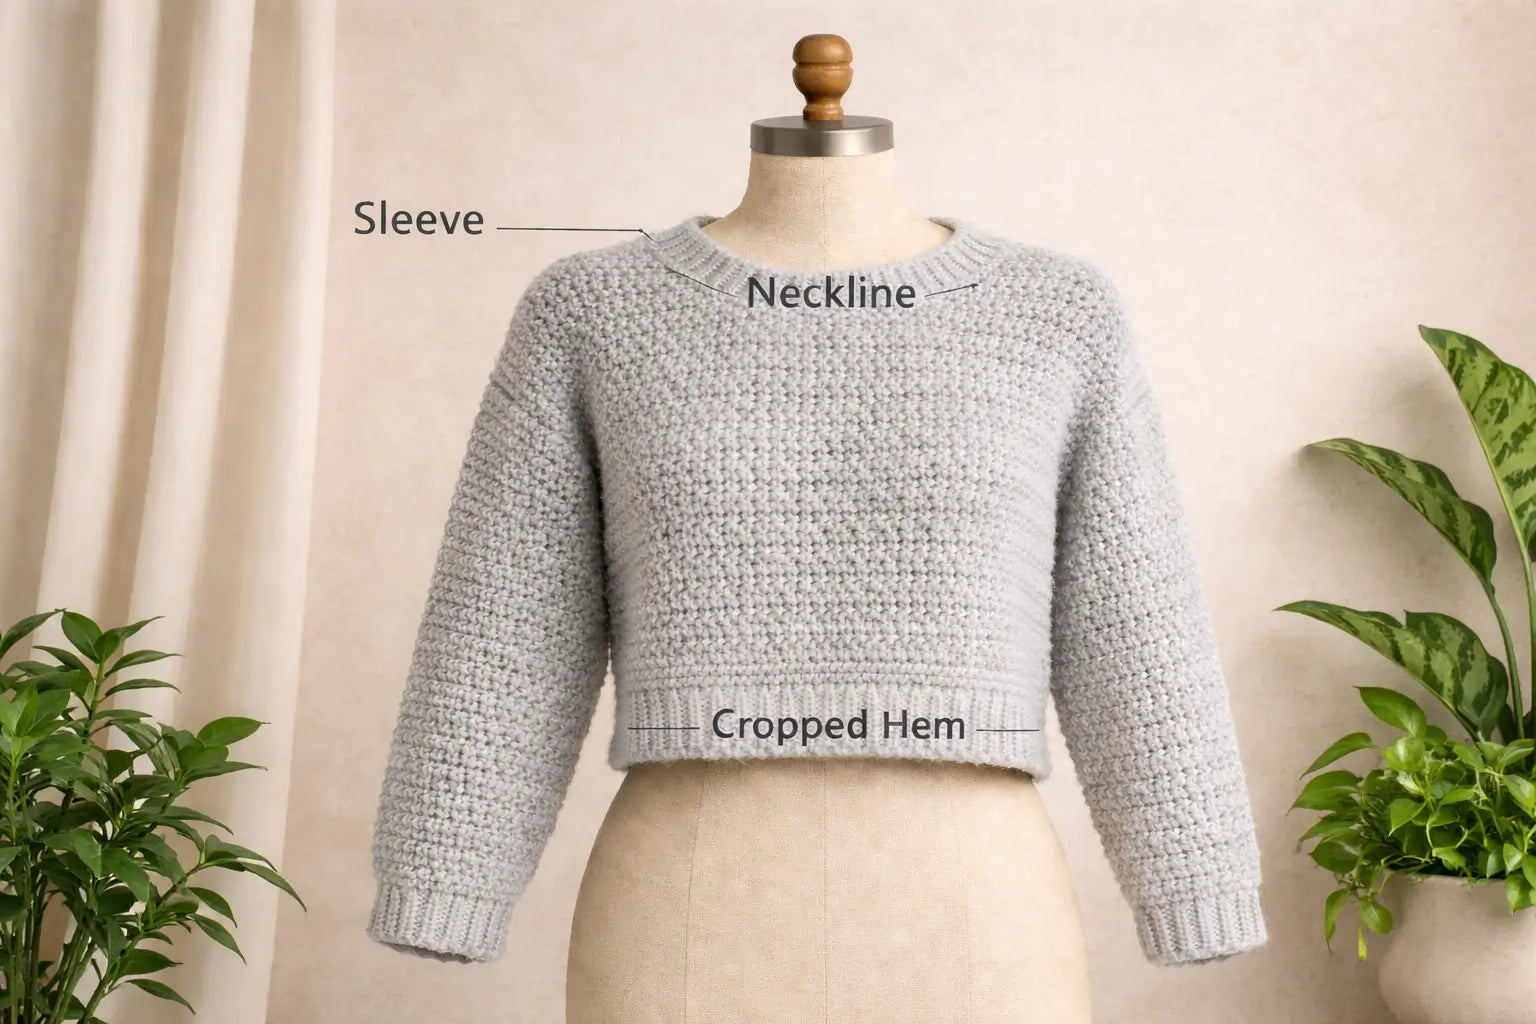
Style decisions: neckline, sleeves, mesh vs dense stitches (Q5)
Style decisions come down to comfort, layering, and how forgiving you want the fit to be—especially around the neckline and upper body.
Key points:
- Necklines change how secure (or relaxed) the sweater feels on your shoulders.
- Stitch density affects coverage, warmth, and how much the fabric “gives.”
- Sleeve style changes the silhouette more than many people expect.
Quick style guidance:
- Crew/high neck: secure, warm, great for layering; can feel snug if neckline isn’t sized well.
- Wide/boat neck: more open, can be elegant; may need reinforcement if you don’t want stretch.
- Off-shoulder: dramatic and relaxed; fit depends heavily on neckline structure and drape.
- Mesh/light stitches: airy and fast; more forgiving in sizing but less warm/opaque.
- Dense stitches: warmer and more structured; may feel stiffer and show fit issues more clearly.
Boundary conditions:
- If you want an off-shoulder look, prioritize neckline stability and fabric drape.
- If you want warmth in a crop, dense stitches and layering often matter more than length.
Once you’ve chosen a base style, you can tune the “cropped” part safely—without accidentally messing up armholes or sleeve comfort.
Customize the crop safely: body length, sleeves, neckline edits (Q6)
You can make a sweater more (or less) cropped safely by changing length in the right section of the body and checking proportions before you lock in armholes and sleeves.

Key points:
- Cropping usually means changing body length, not shrinking armhole depth.
- Use try-on or measurement checkpoints before you commit to edging and sleeves.
- Make symmetrical changes and re-check measurements after edits.
Safe crop workflow (pattern-agnostic):
- Identify where the pattern builds length (body rows vs hem/edging vs yoke).
- Choose your target crop length based on how you’ll wear it (and where you want the hem to hit).
- Shorten (or lengthen) the body evenly, keeping the armhole depth consistent.
- Try on (or measure against a favorite top) before final edging and sleeve finishing.
- If you edit sleeves or neckline, change gradually and keep both sides identical.
Avoid these common pitfalls:
- Removing length from the armhole area and then wondering why sleeves feel tight or ride up.
- Editing only the front (or only the back) unless the pattern explicitly supports it.
- Skipping checkpoints until the sweater is almost done.
Boundary conditions:
- Some constructions are easier to edit than others; panels are often predictable, while yoke-based patterns need careful placement.
- If you change yarn or hook after editing, your crop length may shift again through gauge.
If you’re unsure where to take length out, this rule-of-thumb section makes it clearer.
Where to remove length (and where not to)
The safest place to adjust “crop” is usually the straight body section, before finishing details lock in proportions.
Key points:
- Best place to adjust: the body section where the pattern repeats evenly (you can add/remove rows cleanly).
- Be cautious around: armhole shaping or yoke transitions, because length changes can affect how sleeves sit.
- Use a checkpoint: measure from shoulder (or underarm—use the pattern’s method) to the hem before final edging.
Practical steps:
- Mark the armhole depth (or yoke end) point in the instructions.
- Make your crop adjustment below that point when possible.
- Re-measure and compare to your target length before committing to hem/ribbing.
Boundary conditions:
- If the pattern is top-down and you’re trying on as you go, you have more flexibility—but keep notes so both sides stay even.
- If the pattern uses a strong border/ribbing element, changing that alone can alter the “look” of the crop.
Even with good planning, small issues can happen—so the troubleshooting table below helps you fix problems quickly.
Troubleshooting: common mistakes + fast fixes (Q7)
Most cropped sweater problems trace back to gauge changes, uneven measuring, or finishing details that stretch—so the fastest fixes target those root causes. Blocking and careful measuring are common finishing tools, but methods should match fiber and the fabric’s behavior.
| Problem | Likely cause | Quick fix | Prevent next time |
|---|---|---|---|
| Sweater is bigger/smaller than expected | Gauge changed (often after washing/blocking) | Re-measure post-block; consider reworking key sections if the difference is large | Swatch, wash/block, and measure before starting |
| Neckline stretches out | Edge too loose; fabric relaxes; insufficient structure | Add a reinforcing round/edge treatment; consider a slightly firmer edging | Plan neckline stability early; test edging on a swatch |
| Front/back panels don’t match | Different tension; counting drift | Block both pieces to the same measurements; rework the larger/smaller piece if needed | Use stitch markers and measure at checkpoints |
| Sleeves are different lengths | Measuring from different points; row counts differ | Match them to the shorter sleeve or rework the longer one | Track rows and measure from the same reference point |
| Body twists or hangs unevenly | Uneven tension; seams pulling | Light blocking and careful seam alignment | Seam slowly, match key points, and avoid over-stretching during finishing |
| Crop feels “too boxy” | Construction choice + too much ease | Adjust ease choice for the next version; refine sleeve/neckline details | Choose construction and ease intentionally from the start |
Boundary conditions:
- Some fibers respond strongly to washing/blocking; others respond subtly, so measure after the same treatment you’ll use later.
- If a fix requires “stretching it into shape,” proceed carefully—over-stretching can distort fit.
If you’re here because you want the crochet look as a product concept (not just a personal make), the optional section below translates “pattern ideas” into “sampling inputs.”
For brands: sampling checklist for a crochet-inspired cropped sweater (Q8)
A crochet pattern is great inspiration, but production sampling needs repeatable specs—measurements, materials, and finish details that can be checked and reproduced.
What to prepare before you request a sample:
- Reference photos (front/back/side) and notes on silhouette (fit, crop length, neckline, sleeve shape)
- A measurement chart (finished garment measurements for at least one size; grading notes if you have them)
- Material targets (fiber feel, yarn weight/hand-feel goals, any must-have performance needs)
- Stitch/look references (what makes it “crochet-inspired”: texture, openness, ribbing look, motif)
- Trim details (labels, hangtags, care labels) and packaging requirements
- Quality checkpoints you will approve on the sample (fit, hand-feel, stitch look, measurement tolerances you care about)
- Your timeline constraints and any destination/shipping constraints (without assuming guarantees)
Why this helps:
- Clear measurements and material targets reduce back-and-forth and make sampling feedback much faster.
- Packaging/label needs are easiest to plan early, not after the sample is approved.
If you already have a tech pack or a reference sample and you want manufacturing input, sharing your target quantities, preferred materials, and target ship window is usually the most efficient starting point.
Now let’s answer the most common quick questions readers ask while choosing and fitting a cropped crochet sweater.
FAQ
-
Q: How do I choose the right cropped sweater crochet pattern for my skill level?
A: Choose a pattern by construction (drop-shoulder/raglan/panels), sizing method (chart vs made-to-measure), and clarity (measurements + assembly notes). If you’re newer to garments, prefer simple stitches, clear repeats, and patterns that include check-in points so you can measure or try on before finishing. -
Q: Drop-shoulder vs raglan: which is easier for beginners?
A: Drop-shoulder often feels easier if you’re okay with seaming, while raglan can feel easier if you prefer shaping as you go and trying on mid-project. The better choice depends on whether you’d rather do tidy seams (drop-shoulder) or tidy increase tracking (raglan). -
Q: What does positive ease mean in a crochet sweater?
A: Positive ease means the sweater’s finished measurement is larger than your body measurement, creating a roomier fit. It’s a deliberate design choice for comfort and layering, and it’s best understood by comparing your body measurements to the pattern’s finished measurements. -
Q: How do I make a sweater pattern more cropped without changing the armholes?
A: Shorten length in the straight body section when possible, and avoid removing length from armhole depth or yoke transitions. Measure or try on before finishing edging so you can confirm the hem hits where you want without affecting sleeve comfort. -
Q: What happens if I substitute yarn or change hook size?
A: Substituting yarn or changing hook size often changes gauge and fabric behavior, which can change the sweater’s finished size and drape. A swatch treated like the final garment is the safest way to confirm whether the substitution keeps the fit you want. -
Q: Why does my neckline stretch out, and how do I prevent it?
A: Necklines can stretch when the edge is too loose for the fabric’s weight or when the fiber relaxes after washing/blocking. Prevention usually means building more structure into the neckline edge and checking stability before finishing; careful blocking and consistent edging can also help.
Summary: your next best step (pick → swatch → adjust → finish)
If you want your cropped sweater to look intentional and fit well, the safest path is to decide the build and fit up front, then let gauge confirm your sizing before you commit.
Takeaways:
- Pick construction first (drop-shoulder, raglan, or panels) so you enjoy the process.
- Use measurements + ease + gauge together to size with confidence.
- Treat your swatch like your garment (wash/block) before measuring gauge.
- Customize crop length in the right place to protect armholes and sleeve comfort.
- When something goes wrong, troubleshoot by checking gauge/measurements and finishing details first.
Scenario-based next steps:
- If you’re a hobby crocheter picking your first sweater: choose a forgiving construction, keep stitches simple, and add check-in measurements.
- If you’re between sizes: decide whether you want a fitted or relaxed crop and use finished measurements to choose intentionally.
- If you’re building a brand concept and want sampling: prepare a measurement chart, material targets, and trim/packaging needs before requesting a quote.