How to Draw a Sweater Pattern That Actually Works: Measurements, Gauge, and a Simple Schematic
When people say “draw a sweater pattern,” they often mean three different things. This guide helps you pick the right one fast—then walks you through a usable sweater schematic, simple gauge math, optional motif/chart placement, and a manufacturer-ready checklist you can send for sampling.
What “Draw a Sweater Pattern” Means
A “sweater pattern” can mean (1) a fashion sketch of the sweater, (2) a knitting pattern draft with a schematic and gauge-based stitch counts, or (3) a stitch/motif chart (like Fair Isle or cables). Choose the one that matches your goal: drawing for looks, knitting instructions, or motif placement.
Pick your path (quick decision tree):
- You want it to look right (presentation): go to Quick Sweater Sketch
- You want it to fit and be buildable (construction): go to Schematic + Measurements + Ease
- You want the knit design/motif: go to Motif / Stitch Chart Placement
- You want to make it with a manufacturer: go to Tech Pack Checklist

Quick Sweater Sketch That’s Easy to Understand
If your goal is a clear drawing (not full knitting instructions), do this first. It also becomes the “flat sketch” used in a tech pack.
Quick sketch steps (5–7)
- Draw the silhouette (front view): body + sleeves as simple shapes.
- Choose neckline (crew/V/turtleneck) and draw it cleanly.
- Choose sleeve type (raglan / set-in / drop shoulder) and mark the seam lines.
- Add rib areas (neckband, cuffs, hem) as separate bands.
- Mark openings/trims (buttons, zipper, pockets) if any.
- Indicate pattern zones (stripe area, jacquard panel, cable panel).
- Draw the back view with the same structure and notes.
What to label on your sketch (mini checklist)
- Neckline type + rib height
- Sleeve type (raglan / set-in / drop shoulder)
- Hem/cuff rib height
- Closure/trims placement
- Pattern zones (where the motif/texture should appear)
- Any special notes (oversized fit, cropped length, etc.)

Minimum Measurements You Need and How to Add Ease
If you want a pattern that fits, you need a measurement plan and ease (extra room beyond body measurements).
Minimum measurements (copy/paste list)
- Chest/bust (body) → used to set garment width
- Finished garment length (shoulder/high point to hem)
- Shoulder width (across back or shoulder points—define your method)
- Armhole depth
- Sleeve length (from shoulder OR from underarm—state which)
- Upper arm / bicep circumference
- Wrist / cuff circumference
- Neck width + neck drop (front and back)
- Hem and cuff rib height (if using rib)
If you need standardized body-measurement references for sizing terms, Craft Yarn Council’s body sizing standards are a common reference point. (craftyarncouncil.com)
Ease in 3 practical rules (no heavy math)
- Ease = garment measurement − body measurement.
- Pick ease based on fit goal: slim, regular, relaxed/oversized (your schematic changes immediately).
- Keep measurement points consistent (don’t mix “from shoulder” and “from underarm” across your notes).
Common measurement-point mistakes
- Not stating units (inches vs cm)
- Mixing where “length” starts (neck vs shoulder)
- Measuring sleeves differently across drafts (shoulder vs underarm)
- Not labeling where on the garment a width is taken (chest vs hem)

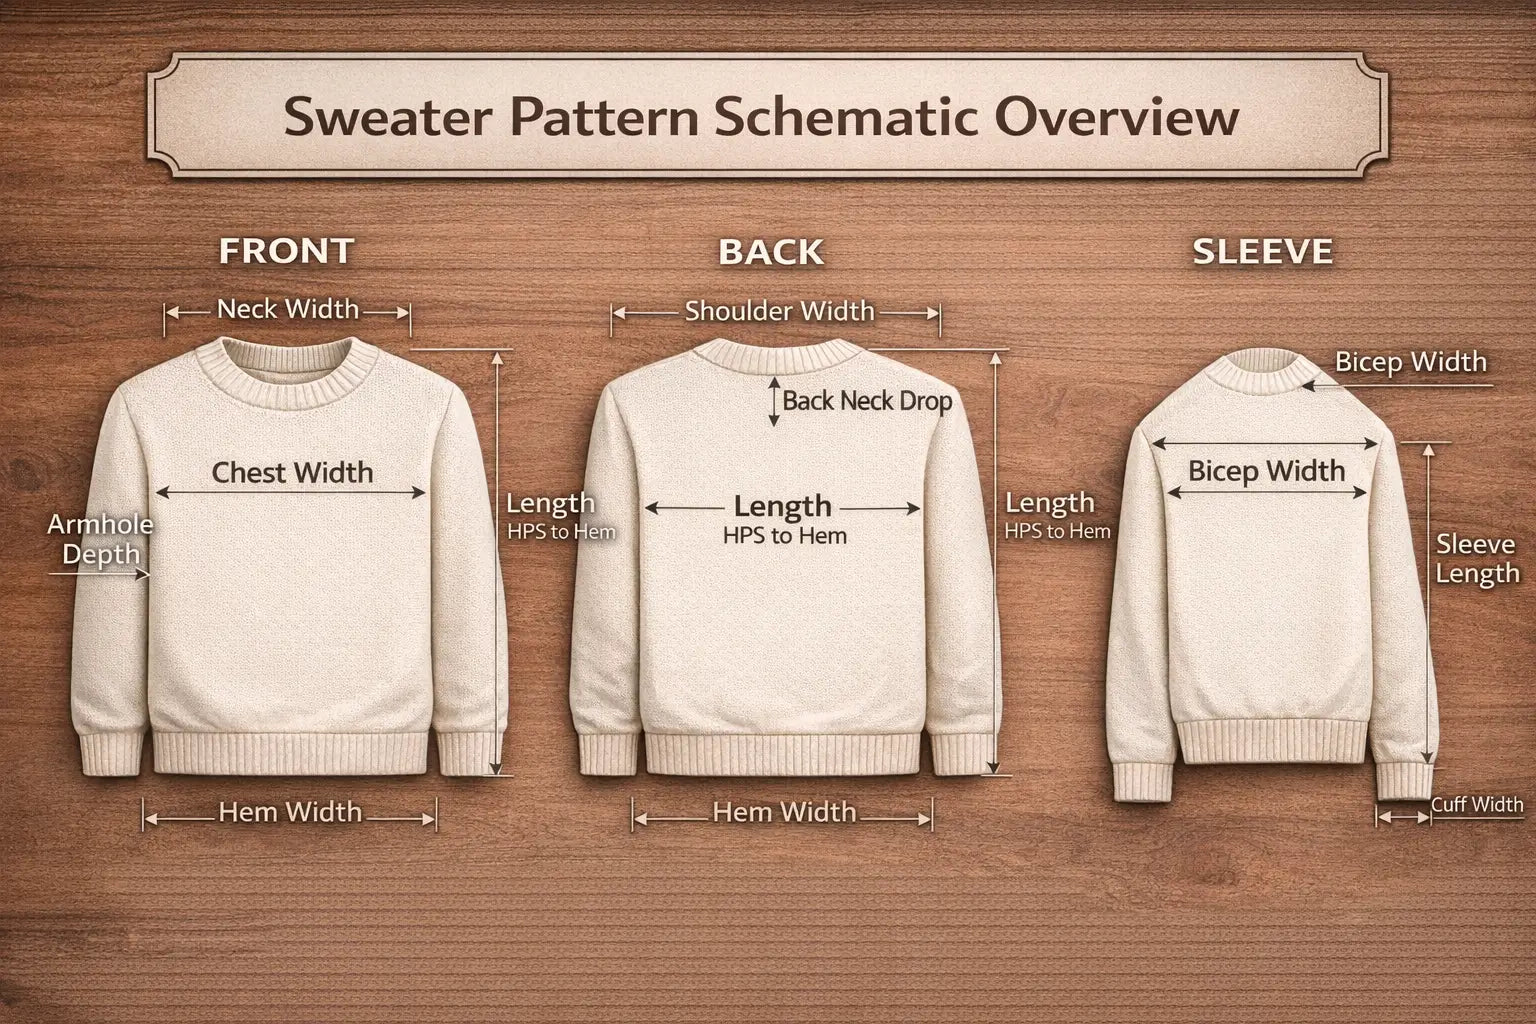
Draft a Simple Sweater Schematic Step-by-Step
A schematic is a simple technical drawing of the sweater pieces (front/back/sleeve) with measurements. It’s the backbone for knitting math and for manufacturing communication.
Step-by-step schematic (Draft v1)
- Pick construction (raglan, set-in, or drop shoulder) and choose fit (slim/regular/relaxed).
- Select target body measurements (your own or a size chart) and write them down.
- Add ease to convert body measurements into garment measurements.
- Draw the body block: a rectangle (width = half chest; height = garment length).
- Mark neckline width/depth and a simple shoulder line/slope.
- Plot armhole depth and sketch a simple armhole curve (keep it basic for Draft v1).
- Draft the sleeve using bicep width, sleeve length, and cuff width (taper if needed).
- Add rib bands (neck, cuffs, hem) as separate measured sections.
- Label every measurement + units, then do one quick revision pass.
What your schematic must include (label checklist)
- Front and back widths (at chest and hem if different)
- Total length and where you measured it from
- Neck width + front/back neck drop
- Armhole depth
- Sleeve: bicep width, sleeve length (reference), cuff width
- Rib band heights
- Notes panel: stitch structure intent + motif intent (if any)
Draft v1 mindset: your first schematic is a clean baseline. You refine after checking gauge and/or after sampling.

Pick a Construction: Raglan vs Set-in vs Drop Shoulder
Your construction choice affects drafting complexity, fit control, and how easy it is to place motifs.
Construction comparison (Table #1)
| Construction | Drafting difficulty | Fit control | Motif friendliness | Notes for beginners |
|---|---|---|---|---|
| Raglan | Easier | Medium | Medium | Gradual shaping; forgiving first draft |
| Set-in sleeve | Harder | High | Lower near armholes | Great fit control but shaping is more complex |
| Drop shoulder | Easier | Low–Medium | High (big front panel) | Simple blocks; can look boxier depending on fit |
Choose raglan if…
- You’re drafting your first sweater and want fewer “sharp” shaping problems.
Choose set-in if…
- You want more tailored shoulders and are okay with more detailed shaping work.
Choose drop shoulder if…
- You want simple rectangles and a large uninterrupted motif area.
Gauge to Stitch and Row Counts: Simple, Practical Math
Gauge is how many stitches and rows fit in a given length (often per inch or per 10 cm). It’s essential because it converts your schematic measurements into stitch/row counts. (knitpicks.com)
Gauge workflow (do this before finalizing stitch counts)
- Knit a swatch in your intended stitch pattern (not just plain stockinette if the sweater won’t be stockinette).
- Wash/block it the same way you’ll treat the finished sweater.
- Measure:
- stitches per inch (or per cm)
- rows per inch (or per cm)
Micro formulas (keep it simple)
- stitches needed = width × stitches-per-unit
- rows needed = height × rows-per-unit
If you change yarn, needle size, or stitch structure
Treat it as a new gauge → you must recalculate stitch and row counts. Many “fit surprises” happen when people keep the same schematic but swap yarn/stitches without recalculating. (blog.tincanknits.com)

Motif / Stitch Chart Placement Without Breaking Repeats
If “pattern” means the design on the sweater (colorwork, cables, texture), you’ll usually work with a chart (grid) and a repeat.
Motif placement rules (copy/paste checklist)
- Define the repeat size (how many stitches wide × rows tall).
- Mark shaping zones first (neckline and armholes change stitch counts).
- Place motifs in “safe zones” first (center front panels, away from edges).
- Keep a clear center line so motifs don’t drift left/right.
- Handle partial repeats intentionally (simplify, mirror, or shift; don’t “accidentally” cut).
- Test the motif in a small swatch/panel at your real gauge.
- Save the chart + notes (colors, stitch symbols, repeat instructions).
Shaping-safe placement (what to avoid near edges)
Necklines and armholes often reduce stitches and create curves—this can distort repeats. Start with the motif centered on the largest stable area (like the chest) and plan transitions as you approach shaping.

Tools and Templates to Draw Faster
You can do this on paper or digitally. Pick tools based on your intended output: sketch, schematic, chart, or manufacturer-ready pack.
Tool comparison (Table #2)
| Tool | Best for | Output | Beginner notes |
|---|---|---|---|
| Graph paper | quick schematic + repeat planning | photo/PDF scan | fastest start, very readable |
| Spreadsheet | gauge math + stitch/row counts | table you can share | reduces calculation mistakes |
| Vector app (Illustrator, etc.) | clean schematics + flats | PDF/SVG | easiest to edit and send |
| Knit design software | detailed charts + sizing | pattern files + charts | learning curve; powerful for repeats |
“Minimum viable template” you can copy
Create one page with:
- Front schematic
- Back schematic
- Sleeve schematic
- Notes panel (stitch structure, yarn intent, motif intent)
- Measurement legend (what each measurement point means)
- Version/date (Draft v1, Draft v2…)
Manufacturer-Ready Knitwear Tech Pack Checklist
If you want a manufacturer to sample your sweater, the goal is to send a clear spec bundle so fewer details are guessed.
Tech pack essentials (10–14 bullets)
- Reference images + style name
- Flat sketch (front/back) with callouts
- Schematic with key measurements + units
- Size range + grading rules (if multiple sizes)
- Yarn/fiber intent (or target handfeel if undecided)
- Stitch structure (jersey/rib/cable/jacquard)
- Motif/chart files + repeat size + colors
- Trims (buttons/zips) + placement
- Color standards (Pantone or physical swatches)
- Tolerances + measurement points (how each point is measured)
- Label/packaging requirements
- Target quantity + target ship window (depends on style/yarn/qty and logistics)
- File formats: PDF + editable source (AI/PSD/SVG/etc.)
Common missing items that cause back-and-forth
- Measurement points not defined (“length” from where?)
- No tolerances (how much variation is acceptable)
- Motif repeat unclear (repeat size, color counts, chart legend)
- Stitch structure missing (a motif looks different in rib vs jersey)
- Only a screenshot provided (no editable source)
Next step (soft CTA):
If you’re preparing a custom sweater for sampling, bundle your flat sketch + schematic + the checklist above into a single PDF, then attach any editable files. A sweater manufacturer can usually tell you what’s missing before sampling begins.
Sampling Workflow and Common Mistakes
Sampling is how you turn Draft v1 into something reproducible. The exact steps can vary by product complexity and supplier workflow.
Typical sampling gates (high-level)
- Concept + references → proto sample → fit review → revisions → approval → (optional) size set → bulk
Mistake → symptom → fix (fast troubleshooting)
- Gauge mismatch → sweater too big/small → re-swatch (in real stitch) + recalc
- Measurement points unclear → lengths off → define points + add tolerances
- Yarn substituted → drape/size changes → confirm yarn intent + new gauge
- Motif near shaping → broken repeats → redesign placement or simplify edge zones
- Missing files → delays/questions → send PDF + editable sources + chart legend
“Before you finalize” risk checklist
- Measurement points defined (and consistent)?
- Units consistent (inches or cm)?
- Gauge verified in intended stitch pattern (and washed/blocked)?
- Motif safe zones planned around shaping?
- Tech pack bundle complete (PDF + sources + references)?
FAQ (PAA-Style)
What is a sweater pattern (and what does it include)?
A sweater pattern can be a sketch, a schematic with measurements, or a stitch/motif chart—what you “need” depends on your goal.
- Sketch = looks
- Schematic + gauge = buildable fit
- Chart = knit design details
What measurements do I need for a sweater pattern?
You need chest, length, shoulder, armhole depth, sleeve length, bicep, cuff, and neckline measurements to draft a basic schematic.
- Add ease for fit
- Label every point + units
- Keep measurement methods consistent
How do you draw a sweater schematic?
A sweater schematic is a front/back/sleeve diagram with every key width and length labeled.
- Start from measurements
- Add ease
- Label armholes, neckline, sleeves, and rib bands
How does gauge affect a sweater pattern?
Gauge converts inches/cm into stitches and rows, so changing yarn or stitch structure changes size unless you recalculate. (knitpicks.com)
- Swatch in the real stitch pattern
- Wash/block like the final garment
- Recalculate stitch/row counts
What’s easier: raglan or set-in sleeves?
Raglan is often easier to draft because shaping is gradual, while set-in sleeves require more precise armhole shaping.
- Raglan: forgiving Draft v1
- Set-in: better tailoring
- Drop shoulder: simplest blocks
How do you place a motif on a sweater without messing up repeats?
Start by defining your repeat and placing it in stable areas before planning transitions near neckline/armholes.
- Mark shaping zones first
- Place motifs in “safe zones”
- Plan partial repeats intentionally
What should I send a sweater manufacturer to make my design?
Send a flat sketch, a schematic with measurements, stitch/yarn intent, motif charts (if any), and a clear checklist of files and standards.
- PDF + editable sources
- Defined measurement points + tolerances
- Clear chart legends and repeat sizes
Why do sweater samples come back fitting differently than expected?
The most common causes are gauge differences, unclear measurement points, or yarn/stitch substitutions.
- Recheck gauge in the real stitch pattern
- Clarify where each measurement is taken
- Confirm yarn/stitch structure before final approval