How to Make Your Own Sweater Pattern (From Scratch): Measurements, Gauge, and the Math
Draft Your Own Sweater Pattern in 7 Steps
Drafting your own sweater pattern is a repeatable workflow: set a fit target, lock in your finished gauge, then convert measurements into stitch and row counts you can knit and test.
- Pick a simple construction (raglan, yoke, or drop-shoulder) and decide top-down vs bottom-up.
- Decide the fit (fitted/relaxed/oversized) and write down your target finished measurements.
- Knit a swatch in the same method as the sweater (flat or in the round), then wash/block it.
- Measure stitch gauge and row gauge on the finished swatch.
- Convert your target measurements into stitch and row counts (then round to workable numbers).
- Draft a simple schematic and map your numbers to each section (body, sleeves, neck, shaping).
- Knit with checkpoints (measure/try-on), adjust if needed, and record your final “v2” numbers.
If you’ve ever had a sweater come out the wrong size, the most common fixes are also built into this workflow: finish your swatch first, measure consistently, and re-check gauge on the real fabric as you knit.
The 7-step quick workflow (copy/paste checklist)
Use this as a “one page” checklist while you draft:
- [ ] Construction chosen (raglan/yoke/drop-shoulder; top-down/bottom-up)
- [ ] Fit goal defined (fitted/relaxed/oversized) + target finished measurements written
- [ ] Swatch knitted in the same method as the sweater (flat or in the round)
- [ ] Swatch washed/blocked and fully dry before measuring
- [ ] Stitch gauge + row gauge measured in the center of the swatch
- [ ] Stitch/row counts calculated and rounded to workable stitch-pattern multiples
- [ ] Schematic drawn + numbers mapped to body/sleeves/neck/shaping
- [ ] Checkpoints planned (when you’ll measure/try-on and what you’ll compare to)
Before you calculate anything, it helps to get three terms crystal clear: gauge, ease, and schematic.
Key Terms Before You Start: Gauge, Ease, Schematic
These three concepts explain almost every “why didn’t it fit?” moment in sweater drafting.
- Gauge: how many stitches and rows you get per unit of measurement in a specific stitch pattern, after finishing.
- Ease: the difference between body measurements and finished garment measurements (it’s the fit decision).
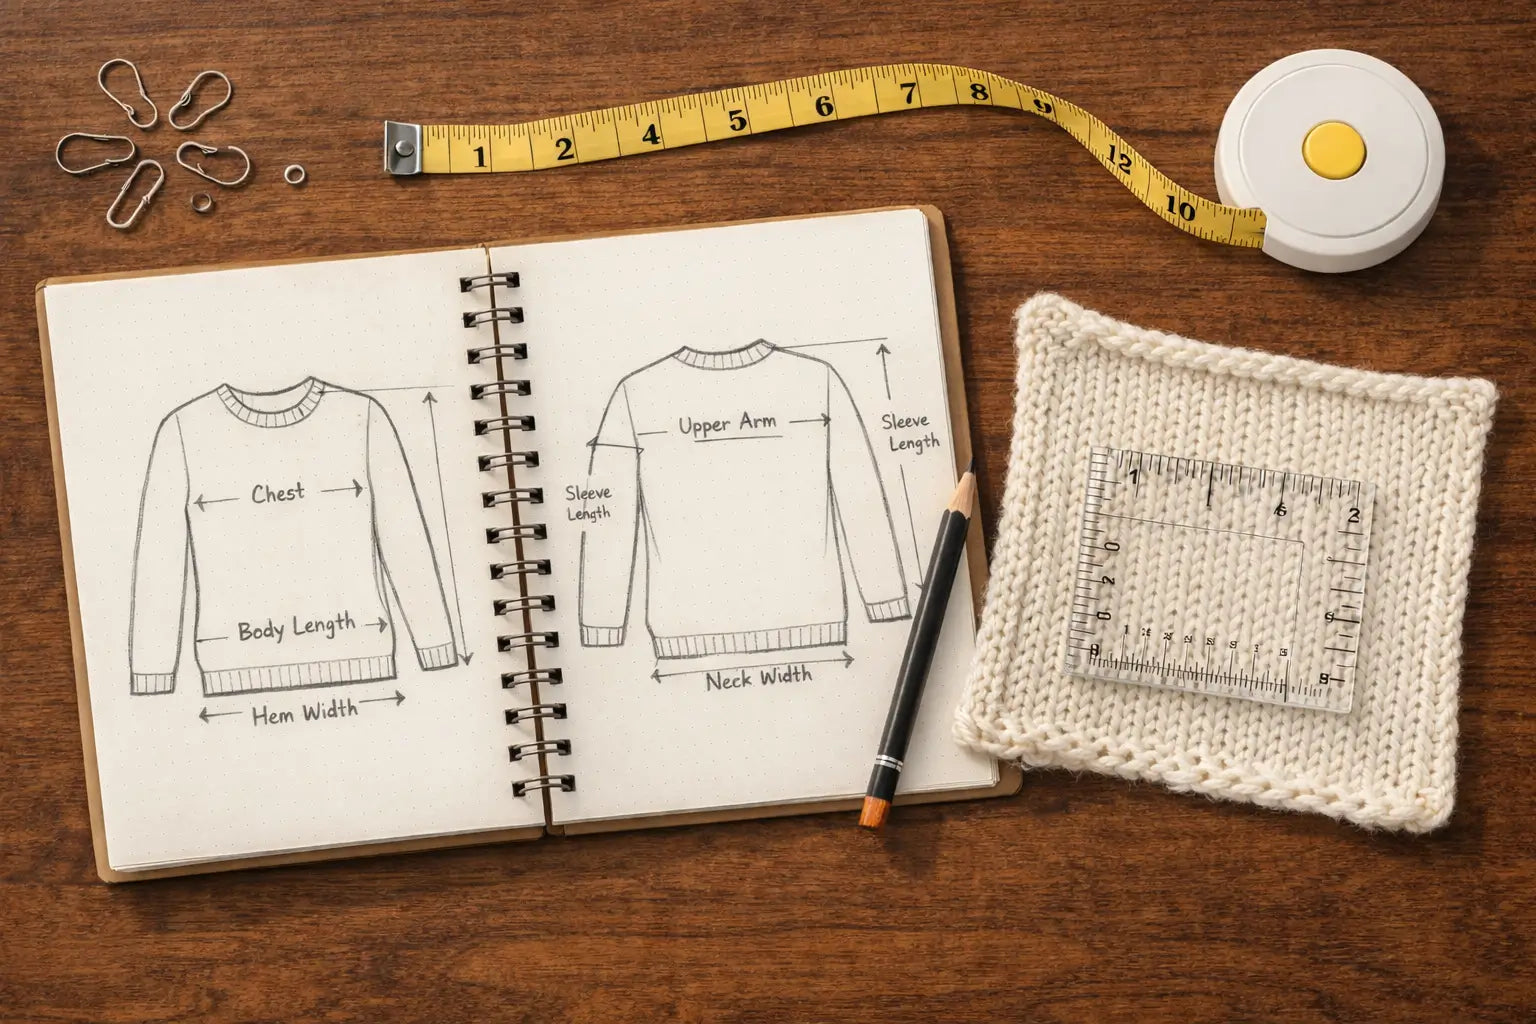
- Schematic: a simple drawing (often front/back) that labels the measurements you’re aiming for, so your math has a home.
A quick grounding in gauge will make the rest of the process feel much less mysterious.
Gauge (stitches + rows per unit) — why sweaters magnify small errors
Gauge controls size because your sweater is basically “measurement × density.”
- Stitch gauge affects widths (chest, sleeve circumference, neck opening).
- Row gauge affects lengths (body length, sleeve length, armhole depth).
Small differences compound. If your fabric is even slightly denser or looser than you planned, that effect repeats across dozens or hundreds of stitches/rows—so the finished sweater can drift noticeably.
- It’s normal for row gauge to be more variable than stitch gauge, especially across different stitch patterns or when you change from body to sleeves.
- It’s also common for gauge to differ flat vs in the round, which is why swatch method matters.
Once you understand gauge, “ease” becomes the simplest (and most powerful) fit lever you control.
Ease — the simple formula and the fit decision behind it
Ease is the difference between the sweater’s finished measurement and your body measurement.
- Ease = finished garment measurement − body measurement
Positive ease means the sweater is larger than your body at that point (looser fit). Negative ease means it’s smaller (fitted/stretch fit). The “right” ease is a style decision first—and it can vary by body area (for example, you may want different ease at the upper arm than at the chest).
Because ease is a choice, it’s best to decide your fit goal before you do any stitch math.
A schematic is the tool that keeps your measurements, ease, and math organized.
Schematic — the bridge between measurements and pattern instructions
A schematic is a simple drawing of your sweater (often front and back) that labels key measurement points and shows the outline of the pieces or sections.

A schematic helps you:
- see what you’re actually trying to build,
- decide which measurements matter most for your chosen construction,
- and map every calculation to a specific part of the sweater.
Different constructions change the schematic details (for example, a raglan includes raglan “depth” and sleeve/body split points), but the idea is always the same: your math should serve a drawing.
With those terms in place, you’re ready to draft a sweater pattern the way designers and tech editors think about it: as a workflow with decisions and checkpoints.
The Workflow: From Idea → Schematic → Testable Pattern (Q1)
A reliable “from scratch” sweater pattern is built by locking the inputs (fit target + finished gauge) and then documenting calculations in a way you can test and adjust.
Key points that keep you out of trouble:
- Decide construction first; it determines the order of your shaping and calculations.
- Set finished measurements and ease before math; otherwise you’ll chase numbers without a target.
- Treat swatching as a prototype step: finish it the same way you’ll finish the sweater.
- Build checkpoints into your knitting so you can correct course early.

A practical drafting workflow:
- Define your “base sweater”: construction + neckline + sleeve style + main stitch pattern.
- Choose a fit goal and write target finished measurements (not just body measurements).
- Swatch in the same method as the sweater, wash/block, then measure gauge.
- Convert measurements to stitch/row counts, then round to workable stitch-pattern multiples.
- Draft a schematic and annotate it with your stitch/row counts by section.
- Write instructions in the same order you’ll knit (so your notes are usable).
- Knit a test version (or at least a partial prototype), measure/try-on at checkpoints, and revise your numbers.
Most drafting frustration comes from doing the steps out of order—especially calculating before you have a finished gauge and a clear fit target.
Decide your “base sweater” (construction + style details)
Choose the big decisions up front, because each one changes your measurements, math, and rounding constraints:
- Construction: raglan, circular yoke, or drop-shoulder
- Direction: top-down or bottom-up
- Neckline: crew, V-neck, or higher neck (turtleneck/mock neck)
- Sleeve shape: straight, tapered, or with shaping
- Hem/cuff finish: ribbing type and length
- Stitch pattern: stockinette, rib, cables, colorwork, etc.
If you plan colorwork, cables, or heavy texture, treat that stitch pattern as a “different fabric” and swatch it separately—texture often changes gauge and stretch.
Once those decisions are made, you can plan checkpoints that match how your sweater is constructed.
Add checkpoints: when to measure and adjust during knitting
Checkpoints turn drafting from a gamble into an iterative process.
Common checkpoints that work for many sweaters:
- After the yoke/upper body shaping: compare neckline fit and upper chest/shoulder area.
- Before separating body and sleeves (or before attaching sleeves): confirm body circumference.
- Mid-body: confirm body length and hem width direction (is it drifting larger/smaller?).
- Early sleeve: confirm upper-arm circumference; sleeves often knit at a different tension.
- Before finishing: measure key lengths and compare to your schematic.
Try-on is easiest when the construction allows it (often top-down seamless styles), but measuring the fabric against your schematic works in any construction.
With a workflow in hand, the next step is setting measurements and ease so you know what you’re trying to achieve.
Measurements + Ease: Set Your Fit Target (Q2)
You draft more accurately when you measure for the garment you want to wear, not just the body you have—so start by deciding your fit goal and recording target finished measurements.
Core ideas:
- Separate body measurements from finished garment measurements.
- Decide ease as a style choice, then turn that into finished targets.
- Use a sweater you already like as a reality check (especially for neck and upper arms).

Measurement points to consider (at minimum):
- Chest/bust circumference (or half-chest width if measuring flat)
- Hem circumference
- Body length (from shoulder to hem, or underarm to hem—choose one method and stick with it)
- Upper arm circumference
- Sleeve length
- Neck opening width/circumference (or neckline depth if that’s the design driver)
A quick map from measurement to what it affects helps you prioritize.
| Measurement point | Affects what in the sweater | Common drafting “gotcha” |
|---|---|---|
| Chest/bust | Overall body width/fit | Measuring body but drafting garment without deciding ease |
| Upper arm | Sleeve comfort and mobility | Sleeves often knit at a different tension than the body |
| Armhole depth / yoke depth | Shoulder/arm mobility + where sleeves sit | Depth changes between constructions |
| Neck opening | Comfort + how the sweater sits on shoulders | Necklines can feel tight even if chest fits |
| Body length | Proportion + where hem lands | Row gauge drift changes length quickly |
| Sleeve length | Proportion + cuff placement | Try-on may change once cuff/finishing is added |
Because ease is the “fit decision,” choosing it intentionally is the fastest way to make a drafted sweater feel right.
Measurement checklist (body vs finished garment)
Start with two sets of notes: body and finished targets.
Body measurements (typical):
- Chest/bust
- Upper arm
- Neck circumference (optional but useful for tight necklines)
- Desired length references (where you want hem and cuff to land)
Finished garment targets (what your pattern math uses):
- Finished chest/bust
- Finished upper arm
- Finished hem
- Finished body length
- Finished sleeve length
- Finished neck opening
If you’re unsure where to start, measure a sweater you already love and treat those finished measurements as a “style template,” then adapt details like neckline and stitch pattern.
Measuring consistently matters: use the same method (flat vs around the body) and the same reference points each time, or your calculations won’t match your intent.
Choose ease by fit goal (fitted, relaxed, oversized)
Ease is easiest to choose when you name the look you’re aiming for:
- Fitted look: can use little to no positive ease in the body, and sometimes negative ease in very stretchy fabrics.
- Relaxed look: usually uses positive ease so the sweater drapes without clinging.
- Oversized look: uses more positive ease, but still needs control at neckline and shoulders so it doesn’t feel sloppy.
A few practical notes:
- Stretchy stitch patterns (like rib) can “feel tighter” at the same measurement, because they grip the body.
- Dense textures (like cables) can reduce stretch and change drape, so the same ease number can feel different.
- It’s common to want more ease at the upper arm than you want at the chest for comfort and movement.
Once your measurements and fit target are written down, swatching becomes the step that turns those targets into reliable stitch and row counts.
Swatching for Reliable Gauge (Flat vs In the Round) (Q3)
A sweater swatch is only useful if it matches the real sweater fabric: same stitch pattern, same method (flat vs in the round), and measured after finishing.
Key points:
- Measure gauge on a finished swatch (washed/blocked and dry) if you plan to wash/block the sweater.
- Measure in the center of the swatch; edges distort.
- Swatch in the round if your sweater is worked in the round or if your round gauge differs from flat gauge.

A repeatable swatching approach:
- Knit a swatch in the same stitch pattern you’ll use (stockinette, rib, cables, colorwork, etc.).
- Use the same method as the sweater (flat or in the round).
- Finish it the way you’ll finish the sweater (wash/block, then let it fully dry).
- Measure stitch gauge and row gauge in the center area.
- If gauge is off, adjust needle size and swatch again before doing sweater math.
It’s normal to need more than one swatch—think of it as “dialing in your fabric” before you commit to a whole garment.
For deeper background on ease and swatching methods, these references are widely used by knitters:
- Purl Soho (ease and choosing size): https://www.purlsoho.com/create/understanding-ease-selecting-your-size/
- Purl Soho (swatching for circular gauge): https://www.purlsoho.com/create/swatching-for-circular-gauge/
- Ysolda (swatching in the round): https://ysolda.com/blogs/journal/swatch-in-the-round
With finished gauge measured, you’re ready for the part that feels intimidating—but is actually straightforward: the math.
Swatch workflow (knit big enough → finish → measure → adjust needles)
A reliable gauge measurement is more about method than perfection.
- Make the swatch large enough that you can measure a central area (avoid measuring the edge stitches).
- Use the same needle material if possible; some knitters’ tension changes between materials.
- If your sweater will be in the round, consider swatching in the round—many people knit more tightly or loosely depending on method.
- If your sweater includes a yoke motif or heavy texture, swatch that fabric too; it may have its own gauge.
After you have stitch gauge and row gauge, converting measurements to counts becomes a simple “density × length” process, plus a rounding step for stitch patterns.
The Math: Turn Gauge + Measurements Into Stitch/Row Counts (Q4)
You can calculate most sweater numbers with two formulas—then you round to a stitch count that works with your stitch pattern and keeps the garment balanced.
Key points:
- Use one unit system (inches or centimeters) consistently end-to-end.
- Stitch gauge drives widths; row gauge drives lengths.
- Rounding is not “cheating”—it’s adapting raw math to real stitch repeats and symmetry.
Start with a simple formula box so you can reuse it across the whole sweater.
Quick formula box (stitches + rows) with variable definitions
| What you’re calculating | Formula | Notes |
|---|---|---|
| Stitch count for a width | stitches = (stitches per unit) × (target width in units) | Round to a workable stitch count for your stitch pattern |
| Row count for a length | rows = (rows per unit) × (target length in units) | Row gauge often drifts; re-check during knitting |
If you measure gauge over 4 inches or 10 cm, convert it to “per 1 inch” or “per 1 cm” first so the formulas stay consistent.
Once you have the raw counts, the real drafting skill is rounding without breaking the fabric design.
Rounding + stitch-pattern multiples (how to adjust without breaking symmetry)
When your raw stitch count isn’t a neat whole number, round it in a way that respects constraints:
- Stitch-pattern multiple: many patterns repeat every N stitches (for example, a repeat might need a multiple of 6, plus 2 edge stitches).
- Symmetry: for centered motifs, you may need equal “side stitches” on both sides of a center line.
- Seams or joins: if your sweater is seamed, front/back stitch counts often need to align in a predictable way.
A practical rounding approach:
- Compute the raw stitch count from gauge and target width.
- Identify the stitch pattern constraint (repeat multiple, plus any edge stitches).
- Round to the nearest workable number that satisfies the repeat and keeps the layout balanced.
- Check what that rounding does to the finished measurement (it should still match your fit intent).
If rounding changes your finished measurement more than you like, that’s a sign to re-check the fabric: a small gauge adjustment (via needles) often solves bigger rounding frustrations.
A cast-on calculation is the most common place people want a concrete example.
Cast-on example (method walkthrough, not fixed numbers)
Here’s the method for a body cast-on (or starting stitch count), using variables you can plug in.
- Choose your target finished chest/bust measurement (based on your fit goal and ease).
- Convert that to the width you need in your chosen construction (for example, body circumference vs half-body if knitting flat).
- Convert your stitch gauge to stitches per 1 unit (1 inch or 1 cm).
- Calculate raw stitches = (stitches per unit) × (target width).
- Apply stitch-pattern constraints:
- If your hem uses ribbing, confirm rib multiples.
- If your body uses a different stitch pattern, confirm that multiple too.
- Round to the nearest stitch count that satisfies the multiple and preserves symmetry.
- Record the final cast-on number and note the rounding rule you used (so you can reuse it for other sizes or revisions).
Once your math is locked, choosing a construction becomes a strategic decision about fit control, try-on opportunities, and how much shaping you want to manage.
Choose a Construction: Raglan vs Yoke vs Drop-Shoulder (Q5)
The easiest construction to draft is the one that matches your style goal and gives you checkpoints you’re comfortable using—many beginners find raglans and drop-shoulders simpler to adjust than highly fitted set-in sleeves.
Key points:
- Raglan: predictable shaping lines and frequent try-on checkpoints (especially top-down).
- Circular yoke: clean look and great for motifs, but yoke depth and motif placement can constrain adjustments.
- Drop-shoulder: straightforward shapes and simpler math, but shoulder fit and sleeve attachment need care.

| Construction | Drafting difficulty (typical) | Fit control | Best checkpoints | Best for |
|---|---|---|---|---|
| Raglan | Medium | High | Early neckline/upper body fit; before sleeve split | Beginners who want adjustability and a classic look |
| Circular yoke | Medium to high | Medium | Motif placement + yoke depth checks | Colorwork motifs and a smooth shoulder line |
| Drop-shoulder | Low to medium | Medium | Body width/length first; sleeve fit after attachment | Simple shapes, relaxed styles, quick drafting |
If you’re torn, pick the one that lets you measure or try-on earlier in the process—early feedback is the fastest path to a good result.
Construction comparison table (difficulty, fit control, checkpoints, best-for)
Use the table above to decide quickly, then commit to one construction for your “base sweater.” You can always draft a second version later once you’ve validated your measurements and gauge.
If you plan to publish or sell your pattern (or you want it to work for more than one body), grading is the next logical step.
Optional: Grade Into Multiple Sizes (Spreadsheet Workflow) (Q6)
Grading is easiest when you separate inputs (finished measurements), rules (rounding and stitch multiples), and outputs (stitch/row counts). Start with one base size that fits well, then scale from there.
Key points:
- Validate a base size first; grading bad numbers scales problems.
- Build a finished-measurement table per size, then convert those to stitch/row counts.
- Keep rounding rules consistent across sizes so the pattern stays readable.

A practical grading workflow:
- Choose a base size and confirm it fits as intended (after finishing).
- Create a size table of finished measurements (chest, hem, upper arm, lengths).
- Convert each measurement to stitches/rows using your gauge.
- Apply shared rules (rounding, stitch multiples, symmetry) consistently across sizes.
- Sanity-check shaping areas (neck, armholes/yoke depth, upper arms)—these often need extra attention and may not scale perfectly linearly.
- Knit-test or at least measure-check one additional size if possible, and revise.
A simple spreadsheet structure makes this much easier to manage.
Spreadsheet columns template (inputs → rules → outputs)
| Column group | Example columns | Why it matters |
|---|---|---|
| Inputs | Size label, target finished measurements, stitch gauge, row gauge | Defines what you’re aiming for and the fabric density |
| Rules | Stitch multiple, edge stitches, rounding rule, symmetry notes | Prevents random rounding that breaks repeats |
| Outputs | Calculated stitch counts, calculated row counts, final “rounded” counts | Produces the numbers you actually knit from |
| Checks | Back-calculated finished measurement, notes on deviations | Confirms rounding didn’t change fit intent too much |
Once you start grading, you’ll also want a troubleshooting plan—because most “wrong size” problems show up the moment you try to scale a pattern.
Troubleshooting: Wrong Size Even After Swatching (Q7)
Most sizing surprises come from one of three things: the swatch didn’t match the sweater fabric, measurements weren’t recorded consistently, or the math was rounded in a way that changed the target more than expected.
Key points:
- Re-check gauge on the actual sweater fabric (not just the swatch).
- Confirm you’re comparing the same measurement method (flat vs around).
- Identify whether the issue is width (stitch gauge) or length (row gauge).
| Symptom | Likely cause | Next action |
|---|---|---|
| Body too wide/narrow | Stitch gauge differs from plan; ease target changed by rounding | Measure stitch gauge on the sweater fabric and recalculate stitch counts |
| Body too long/short | Row gauge drift; measuring method changed | Measure row gauge on the fabric, adjust row counts or length checkpoints |
| Sleeves tighter/looser than body | Sleeve tension differs; circumference affects gauge | Swatch or measure sleeve gauge separately; adjust sleeve stitch counts |
| Neckline feels tight | Neck opening too small; ribbing/finishing changes stretch | Re-check neckline measurement; adjust cast-on and ribbing structure |
| Yoke doesn’t sit right | Yoke depth/shape mismatch; motif constraints | Adjust yoke depth and check fit at earlier checkpoints |
A few prevention habits will save you the most time.
Symptom → likely cause → next action table
Use the table above as a quick diagnosis tool. The fastest improvement comes from measuring what you actually knitted (the real fabric) and updating your calculations from that reality, rather than guessing.
If you want fewer surprises on your next draft, adopt a checkpoint routine.
Prevention checklist: mid-knit checkpoints to catch sizing issues early
- Measure stitch gauge on the real fabric once you have a large enough section (not just the swatch).
- Compare body width before you commit to full length.
- Confirm yoke or armhole depth before separating sleeves/body.
- Check upper-arm sleeve width early (don’t wait until the sleeve is finished).
- Track your numbers: write down any needle changes, gauge shifts, and the exact rounding choices you made.
If your goal is personal knitting, these habits are usually enough. If you’re drafting for a brand or planning to produce a design, you’ll also want a clean spec document to communicate the same intent to someone else.
Optional: Manufacturer-Ready Spec (Tech Pack Checklist) (Q8)
If you want a factory to sample or produce your sweater design, you’ll usually need a spec-style document that translates your idea into measurable requirements—not just a knitting narrative.
Key points:
- Provide clear measurement points and target finished measurements (by size, if applicable).
- State the intended fabric density (gauge/stitch density) and stitch pattern details.
- Include visual references (sketches, photos, diagrams) so construction and details are unambiguous.
Minimum viable tech pack checklist (copy/paste)
-
Style overview:
- Front/back sketch or clear photos of the intended look
- Notes on neckline, hem/cuff finishes, and key design details
-
Construction notes:
- Raglan/yoke/drop-shoulder (and whether seamless vs seamed conceptually)
- Any special shaping or motif placement constraints
-
Fabric + density:
- Yarn/fiber intent (or acceptable alternatives)
- Target gauge/stitch density and stitch pattern notes (especially for cables/colorwork/rib)
-
Measurement spec:
- Named measurement points and target finished measurements
- Any tolerances you care about (if you have them; otherwise ask what’s typical for the supplier)
-
Size range:
- Which sizes you want to sample and how you plan to scale (if applicable)
-
Trims/branding (optional):
- Labels, hangtags, packaging requirements
Hand-knit concepts don’t always translate 1:1 to machine knitting, and feasibility can depend on yarn availability and gauge range. A clear spec reduces back-and-forth, but sampling is still an iterative process.
If you’re preparing a knitwear sampling request, you’ll get better, faster answers when you send: (1) your tech pack/spec, (2) target quantities, (3) target ship date, and (4) reference images. A knitwear manufacturer like XTCLOTHES (xtclothes.com) can review the details and advise on next steps.
If you’re still in the DIY stage, the FAQ below covers the most common “stuck points” people hit while drafting.
FAQ
-
Q: What is gauge in knitting, and why does it matter for sweater patterns?
A: Gauge is how many stitches and rows you get per inch or centimeter in a specific stitch pattern after finishing. It matters because every sweater measurement is “measurement × gauge,” so small gauge differences can become big size changes across a whole garment. -
Q: What is ease, and how do I choose positive vs negative ease for my fit?
A: Ease is the difference between finished garment measurements and body measurements. Choose positive ease for looser drape, and consider negative ease only when the fabric is very stretchy and the style is meant to fit close—always test with your actual stitch pattern and finishing. -
Q: What measurements do I need to draft a sweater pattern (body vs garment)?
A: You need target finished garment measurements for the areas that control fit (chest/bust, upper arm, lengths, and neckline at minimum). Body measurements help you decide ease, but the stitch math should be based on finished measurements you actually want the sweater to have. -
Q: Should I swatch in the round for a sweater, or is flat swatching enough?
A: Swatch in the round if your sweater is knit in the round or if you know your round gauge differs from your flat gauge. Many knitters have different tension between methods, so matching the sweater method usually produces a more reliable fit. -
Q: How do I calculate the cast-on stitch count from gauge and chest measurement?
A: Convert your stitch gauge to stitches per 1 inch (or 1 cm), multiply by your target finished width, then round to a workable stitch count for your stitch pattern and symmetry. If rounding changes the measurement more than you like, adjust gauge (needle size) and re-swatch rather than forcing the numbers. -
Q: How do I handle stitch-pattern multiples when my math gives an awkward stitch count?
A: Identify the repeat multiple and any required edge stitches, then round to the nearest stitch count that satisfies that rule while keeping the layout balanced. Always back-calculate what the rounded stitch count means for the finished measurement so you don’t accidentally change the intended fit. -
Q: Why did my sweater come out the wrong size even though I swatched?
A: The most common reason is that the swatch didn’t match the sweater fabric (method, stitch pattern, or finishing), or the gauge shifted during knitting. Measure gauge on the actual garment fabric, compare it to your target, and recalculate using the real numbers before deciding how to fix it. -
Q: What should I include in a knitwear tech pack if I want a manufacturer to sample my design?
A: Include a clear style overview, construction notes, target stitch density/gauge, a named measurement spec with finished measurements, and size range intent. Add photos or diagrams for details like neckline, cuffs, and motifs so the sampling team can interpret your design consistently.
Summary + What to Do Next
A self-drafted sweater pattern is much easier when you treat it like a workflow with locked inputs and checkpoints.
Key takeaways:
- Decide construction and fit target first; your calculations depend on those choices.
- Swatch in the same method as the sweater and measure after finishing.
- Use simple formulas for stitches/rows, then round to workable stitch-pattern multiples.
- Document a schematic and build checkpoints so you can correct course early.
- When something goes wrong, measure gauge on the real fabric and recalculate from reality.
If you’re knitting for yourself, your best next step is to draft one “base sweater” and refine it into a reliable personal template. If you’re drafting for a brand, a clean measurement spec and a repeatable math workflow also set you up for grading and production conversations.
If you’re ready to explore sampling or production, prepare a minimum spec (visuals, construction notes, target gauge/stitch density, finished measurements, and size range) before reaching out—clear inputs make quoting and sampling discussions far more efficient.
:%20Measurements,%20Gauge,%20and%20the%20Math)